Thursday, December 30, 2010

Memory Book

Well, as the new year appproaches, I have been thinking a lot about memories (really more about the thousands of pictures I am behind on printing) and I realized I never shared this memory book that I created as a hostess gift for a retired colleague. One of the stresses of my holiday season is to figure out what to bring to this party, since I hate choosing wine for people, and I already bought coffee last year,  and he has a thing about eating food he hasn't made, you get the idea. Well they just had their first grandchild, and I cannot tell you the joy it brings to my heart to know that there will be a child more spoiled by his grandparents than my children (seriously  - they brought in contractors to re-do their basement for his own area - he is two months old! Love it!!).

Caroline (Caroline's Craftography) had given me this idea by sending me one of LorraineB's videos (Card Creations by Lorraine) and I was hooked after watching the teaser video. She has a whole series of how to create these sweet memory books made with 3 sheets of white paper as a base, and you can see them all by clicking the link here. (As long as you are over there check out the rest of her videos if you have the time, she has the best ideas!) Now, my advice to you is to watch them all before starting (unlike some people I know who thought she would cheat and watch as she made - don't recommend it - oh the words my children probably learned that day). And so now I will shut up and actually post the project!

front - all wrapped up
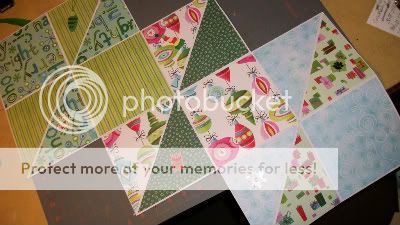
front side - open

back side open
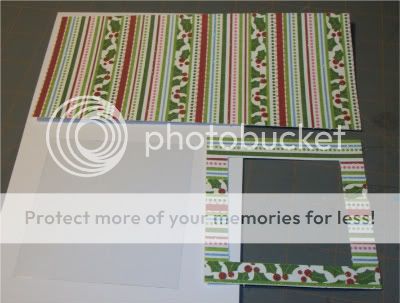
closeups of front paper

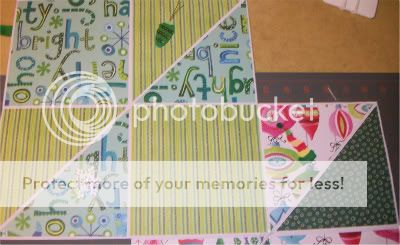
closeups of back paper
The crafty details:

For the front cover I used the candy cut on the Gingerbread Seasonal Cart, and cut it out in red and white paper. I used my Cri-kuts gel pens to draw the title using the font on Nursery Rhymes, and then colored it in with a red marker. The paper is all from the K and Company Secret Santa stack which I loved so much I may have had to go out and get a second stack for just in case. I added some sticker from my stash, but I don't know if I would do that again, because they add to the bulk of the book when you fold it up.

I totally can't wait to try this again, and I have a colleague expecting a baby soon, so I am looking forward to doing it in baby paper. My only complaint is the centers of the white paper started to get worn from the folding and unfolding even before I was done, but it must have been the paper I used. I shall have to ask Lorraine what brand of cardstock she used. Oh, and I didn't really like doing so much cutting with the trimmer to create the squares and trianngles so I created a file that uses George to do it for me! I am willing to share if anyone wants it, just shoot me an email. (....which reminds me my gypsy is not updated, so I better get on that)

Tuesday, December 21, 2010

Last Minute Gifts!

I was totally inspired by the pictures Diane (MyTimetoCraft) posted on her blog - since she had been creating a bunch of the boxes from Wrap it Up, and I was looking for a creative way to package some quick gifts for the secretaries at school (since I know who really runs the building) and this is the end result.


The crafty details:
 These are the poinsetta pillowbox from Wrap It Up, cut at around 8 inches ( too tired to go get my Gypsy right now), and that made them the perfect size for a single package of coffee that my grocery store sells for a dollar. (I was also able to squeeze a small ornament in there.) I cut the flower layer twice since I wanted it to have more layers, and used brads and my Big Bite to attach them to the larger layer. I also cut apart a small Wilton bag for the clear layer behind the cutout.

The top picture is paper from the DCWV Winter Stack, and I inked the flowers with red and green before attaching them with a glitter brad. The second picture is paper from a K and Company Christmas stack, with some DCWV cardstock flower layers but some Making Memories paper flowers as well.

I hope to post at least one or two more thing before Christmas!

Sunday, December 19, 2010

Glitter It Up!

I decided I would try the infamous glitter balls that I heard so much about and I really expected to do about 6, but 15 later is when I actually said enough. Now I had initially planned on using the floor wax method that I had heard so much about, but I saw this product called Glitter It at ACMoore and then the next week it was featured on My Pink Stamper, so I decided to give it a shot. And here are all the results:


The crafty details:

Well my Glitter It experience was not a 100% positive one, mostly because I followed the directions too closely. The first step is to clean out the inside of the ornament with a vinegar and water solution and let it dry. I skipped that for the first couple but then did not get the desired results so I went back and did it for the rest of them.

Here's the problem I have with the directions: they say pour a small amount in and that should be enough. Now I don't know what their definition of small amount is but it definitely does not match mine. So here's MY advice - unscrew the top and pour a generous amount into each one and swirl it around. Then pour the excess back in the bottle. Then again, my definition of small amount of glitter did not match theirs. Pour enough in to cover the inside, and if it looks like it is not covering, pour some more. I will admit that this was very hard for me since I like to covet my glitter, and not actually use it.

All of the snowflakes are from the Winter Frolic cart, and the cross is from the Easter cart (with all the inner lines hidden). Here's a tip, the "round snowflake" cuts are not your friend and do not work very well on the balls. After putting two of them on and fighting with the vinyl, I gave up and stuck with the flakes that worked. Transfer tape is really not your friend for this typo of work, you have to suck it up and work without it. Smooth with your fingers and you will have an easier time. Then when I was done I couldn't resist adding adhesive pearls and gems to bling them up. These ornaments are mostly going to the teachers who work at my daughter's school.
This next set I created for friends who have a Christmas party each year. I used Gypsy Font to personalize each with their name, and then the opposite side has the snowflake.


This is the only ornament I used the MS snowflake glitter on and I can't say I love the results. I added white glitter after the snowflake glitter to fill in the gaps and I added a cut from A Child's Year using some sparkly vinyl.
I don't know who this ornament is for, I don't know if I like it enough to give it to anyone! These really were a terrifically easy gift to make - the only thing that takes any length of time is the drying after cleaning it out with vinegar and water. Otherwise, you probably could get a bunch done in an afternoon.

That's all for now, I do have a few more projects to post this week, if I can get them all made, photographed and written. I will do my best!

Thursday, December 16, 2010

Oh Christmas Tree and a Tutorial

The suspense is over, and my tutorial is finally here! Let's begin,  shall we?

The crafty details:

I begin each one with a 7.75 by 3.5 rectangle for the base, a 3.5 inch square of paper for the top layer, as well as a 3.5 (maybe even cut the teensiest bit smaller) inch square of plastic clamshell. I do have a Gypsy file for the base and top layer, but it really was easier to just cut the clamshell on my little Fiskars guillotine trimmer.
I score the base at 3.5 inches and 4.25 inches, and then with a razor make two little slits between the score marks for the pen.

(I hope you can see the lines in the pictures, I realize it is hard to see on the white.) Oh and before I forget, the pens I purchased at Walmart, and they were in the Christmas section. They are 12 pens for $2, and I am happy with the price, however the jury is still out on the quality. My daughter has somehow managed to destroy two of the pink pens - but that could just be a special talent of hers. For a small gift such as these, they really are sufficient.


Now for the front I use my ATG to adhere the plastic piece (with my vinyl already on it ) to the paper layer and then I need to make it ready to shake. AND I am happy to say I have a thrifyt little tip for you. Now normally you could use double sided foam tape, like the 3M scotch tape I used on this holder.

This tape is available at Lowes in a big roll, and it is about $10 for a roll of 3/4 inch tape. HOWEVER, if you are like me you might have some adhesive sided craft foam sheets lyting around, and it works just as well. All I did was use my ATG gun to stick up the side that didn't have any adhesive on it.

And as an added bonus, instead of seeing white tape from the side, they see a nice color instead. Then I simply add a small amount of Martha Stewart snowflake glitter (sorry I forgot to take a picture), and then I put the top and bottom layers together.


And this is the finished product! I layered the vinyl today, using one of the trees on the Christmas Solution cartridge, again cut rather small at 2 inches (or a smidge less), and then added some bling using my I-rock. I would not have attempted the tree this small with paper because I don't think the cuts would have been as smooth. I actually think this one turned out the nicest, and it might just be my favorite. Here is a side view to show the dimension.

 
This does wrap up my post-it shakers for now, but I may have something up my sleeve over the next few days - if the weather and my children cooperate!

Tuesday, December 14, 2010

Shake it Santa!

Shake it up week is continuing here with yet another post-it holder, this one also featuring Santa. This one is a little more subdued then my other designs, so I imagine I will probably give this design to some of my male colleagues.
The crafty details:

In case I haven't mentioned it yet, the paper I have been using this week is from the DCWV Winter and Christmas stacks. Santa is from the new Trim the Tree cartridge, and if he doesn't look exactly the same it is because I liberally used the hide contour feature on my Gypsy as I didn't really love the image as it was (and maybe the teensiest bit because I didn't want to weed all those pesky teeny vinyl pieces). As with the shaler yesterday, Santa is done with vinyl, directly applied to the clamshell piece. I didn't want it to be too plain, so my daughter actually helped me put the brads in the corners to give it just a little more detail.

Another post it holder is coming up tomorrow, along with that tutorial - I promise!

Still Shaking....

Today's post-it holder incorporates vinyl, which in case you haven't figured it out is one of my personal fav crafting mediums. I had this vision in my head of looking out a window and seeing Santa and this is the realization of that.
The crafty details:

This project would not be possible without my Gypsy, and I began by designing a window shape in my 3.5 inch square for the top layer. I just put 4 smaller squares and eyeballed where they belonged. Then after I cut the piece out,  I inked the edges with a Studio G stamp pad,.

The Santa and reindeer are cut very small (I want to say less than an inch and a half but don't know without checking the G file), which is something that vinyl is perfect for, because it is much more forgiving than paper with smaller and intricate cuts. However, I did hide a number of contours on the cut itself so there weren't too many teeny pieces to weed - I am not that patient! I applied the black vinyl directly to the plastic clamshell piece and then added the "window frame" on top. I again backed it with foam tape, added the snowflake glitter and attached it to the body of the holder.

I promise I am working on a pic tutorial to be posted this week and I still have a few more of these up my sleeve if you want to stay tuned! 

Monday, December 13, 2010

Shake It Up Baby Now! Post-it Holder

I am really in love with this next project, especially because it combines two of my obsessions - post it holders and shaker cards! I am going to feature a number of these this upcoming week, as I think these will be my gifts to my colleagues for this holiday season.


The crafty details:
I started out with a 7.25 by 3.5 inch rectangle for the base. Using a score board you score at 3.5 and 4.25 inches. Then between the score marks make two slits with a razor for the pen.

The top layer of the front is a 3.5 inch square with a 2.5 inch square cut out in the middle, and a layer of plastic behind it. The clear plastic is from the clamshell that the Cricut cartridges come in! Don't you just love recycling? I cut them apart as I load and link my cartridges and re-use the plastic in my projects.

My snowman was cut at 2.95 inches and he is from Winter Frolic. I cut the bottom layer  of the snowman as he wouldn't have any facial features so I could use my Peachy Keen Stamps (they were feeling neglected). I tied a little chiffon ribbon around his neck for a scarf and sealed it with a heat set gem using my I-rock.

Then I outlined the outside of the top layer with some foam tape, and placed some Martha Stewart snowflake glitter (which I am love in with and want to use on everything) in the center and very carefully placed the two layers together.

The post-its I got from Staples a few weeks ago when they were 12 for a dollar (and this was accomplished by totally stalking the store waiting for them to get a new order in before the sale was over and bringing my daughter with me so she could get some too) and the mini pens are from the Christmas section in Walmart.

Stay tuned over the next few days for more shaker post-it holders! I am working on a pic tutorial so you can spread the shaker love!

Sunday, December 12, 2010

Vinyl Giveaway Winner

And the winner is....
 SeaSwan said...
I made some vinyl tiles for Christmas gifts. I would like to try layer vinyl next.

Friday, December 10, 2010

Vinyl Mini-Giveaway!

So first I should apologize for neglecting my blog. I have been very busy AND rearranging the craft room that has to masquerade as a dining room for the holidays so I have not been crafting,  but thankfully I have rearranged and can get back into it and my blood pressure can go back down!

As I have been working on my Christmas projects I have realized how essential vinyl is to my crafting! I love, love, LOVE it (in case you couldn't tell) and it really is the perfect medium for a variety of projects. I am very fortunate that I don't have to pay for the vinyl I use in my projects. And no, not because I held up a sign shop (although if my supply ever gets low I will need to feed my addiction and that might be necessary - I won't rule it out), but because my dad's BFF actually does own a sign shop and saves all his scraps for me. What is too small for him to use is actually perfect for me!

So in the spirit of the holidays I want to share the vinyl love and do just a small giveaway of some vinyl scraps, so maybe one of you who has been hesitant to try it can experiment guilt-free! Maybe you need just something to finish one of those last minute gifts or you just want to try out those glitter balls that everyone else is doing. I almost forgot about etching! You can use vinyl for etching - and if you haven't tried that - it is super fun. I do have some projects that I will be posting this week that incorporated vinyl - and nothing else would have worked as well.

So first, the vinyl giveaway disclaimer:
This is a giveawy for vinyl scraps. They are not full 12x12 sheets, and they are also outdoor/sign vinyl. This means I would NOT recommend using them on your wall the way you would cricut/indoor vinyl - you would risk ruining your paint job. It is perfect though for your craft projects or even to use for etching. I am going to try and get the package out to you as soon as possible so you can get started right away!

And to be perfectly clear, I took a picture. The pieces range from approximately 4x10 inches to 7x10 inches. Really it is sort of a vinyl starter set if you will.

To enter, just leave a comment on this post until Sunday, December 12 at 8 pm EST, and be sure to leave a way for me to contact you. You don't have to be a follower, but if you like what you see on my blog I hope you will sign up to be one!

Sunday, November 21, 2010

Lollipop Flowers - How To

I love giving lollipop flowers as quick gifts - they are a nice treat and they look so pretty in a bouquet. Also a good use for paper that you like but not love. They do have a slight learning curve as you learn what works best for you  - but once you find what works best for you - so easy to crank a lot out.

First, you should know that this is a Kathy Orta idea, so therefore...
She also has a wonderful video on her blog, that you can see by clicking here. But if  you don't want to watch the video, or maybe can't right now (like you are at work, not that I EVER use the internet for personal use at work and I am sure you don't either), I have written out the instructions to make these flowers here with just pics.

The crafty details:

Each lollipop needs two flowers, and it works best if they are between 3.5 and 4 inches. I used Plantin Schoolbook for the flowers in these pictures, but you can definitely use George as well - in fact the last set I did I believe that is what I used - the only difference is the number of petals you get (4 and 6 with Plantin Schoolbook and 3 and 5 with George). 

You cut one petal off one of the flowers, and then overlap the two adjacent petals to close the space - basically altering it from 6 petals to 4. I use ATG tape to do this and haven't had any problem with them coming apart.

Next I use a pencil (or some such similar device) to curl the petals. Now it is time to heat up the hot glue gun! Potential burned fingers alert!!

You then gently work to slide the 4 petal layer onto the popsicle stick. Really it should be secure without adding glue to the lollipop base but you can if you so wish.  Then carefully (since I no longer have nerves left in my fingertips) apply a small amount of hot glue to the bottom of the first flower layer, and slide the bottom (6 petal) layer on the stick and slowly smush it (try not to get lost in the technical talk) into the first one. The smushing is necessary since the fit will not be as tight as the first layer but you really don't want to crease it to fit.


And that really is it! I am not going to sugar coat it - there is a slight learning curve - your first ones will not turn out as nice as your last - but I have found that the more you make, the easier it becomes. And I have found that to make them with George is a bit easier (less petals) than using Plantin Schoolbook, but that will also depend on how full you want to make them.

Before I forget - the plain clear wrapped lollipops - I found at the Dollar General  store, only a few dollars for a bag of 15 or so - not sure how they taste, but I love the way that they look and the colors they come in! I don't have to eat them so it doesn't really matter to me!

Well....what are you waiting for?? Get lollipop-ing!

Saturday, November 20, 2010

Quick and Easy Bouquet

Oh vinyl - how do I love thee? Let me count the ways!!

In all seriousness, if you have not tried vinyl yet - what are you waiting for??I absolutlely love working with this medium and today is a great example of that. I needed to put together a quick gift for my daughter to take to her friends at a play and I imediately thought of doing a lollipop bouqet! I had plenty of extra lollipop flowers leftover from Princess Party, so I concentrated on decorating the tin.

The crafty details:

I designed this cut in my gypsy, using the Hannah Montana and Printing Press carts. I used a 3.5 inch star from Hannah, and then put a smaller star inside it. Then I added the text from Printing Press and another teenier star. I grouped it all together and kiss cut it using my vinyl settings - 3 for blade depth, and medium for presure. I weeded the excess and then used painter's tape to transfer it to the tin.

All in all, it probably took me longer to design the Gypsy file than it did to actually cut the vinyl and put it on. If you haven't tried using vinyl in your crafting yet, get to it!!

Friday, November 19, 2010

A Royal Thank You

As we come to the end of Princess week, I have to round out the week with the thank you cards. It took me quite a while to decide on a design that I like for these cards, but once I did they were fairly easy to put together. I did three variations of the same design, because I tend to get bored mass producing the same thing, so I decided to play a little bit with the colors.


The crafty details:

The base of the card are the pre-made blank cards that I got on sale at ACMoore. I did not attach the layer to the front until after my daughter was done writing out the inside, in case there was a disaster - I didn't want to waste a completed card!

The top layer is glitter paper from Target, and I created a rectangle using George with the "thank you" cut out using Mickey Font, leaving enough room on the side for the ribbon I found the Princess Tiana ribbon in the craft section at Walmart, and ran it through my trusty Xyron to make sure it stuck. Then I added the bottom layer of plain colored cardstock, adding the center of the O and A, and adhered the whole thing to the front of the pre-made card. Really easy peasy once I was done obsessing over the design.

Why didn't I stick with the frog you might wonder?? I was tired of the dang thing!!! I need a serious break from that frog and its pain in the hiny teeny legs for a good long while.

I was hoping to show you some pics of the party location but unfortunately the camera I took them with is not cooperating. Hopefully I will at some point be able to get them posted. Thank you so much for joining me for Princess Week!

Thursday, November 18, 2010

Time for the Goody Bags!!

And finally the (what else?) goody bags!!

If you read my first ever blog post, you will know that I admit to going the teensiest, tiniest bit overboard when it comes to the goody bags. And these were filled with all sorts of wonderful things, thank in large part to my Cricut Circle Friends who came to the rescue when I needed more Crayola scrap packs because I could only find 12 in my area. (Some day I shall harness their power and we will take over the world! BWAHAHAHA)

 The crafty details:

These phrases are all from Once Upon A Princess and the bags were made using Heat Transfer Vinyl. Once again I get my vinyl from Nick at Craft Vinyl, and they are a plain vinyl base with the glitter top layer. The "angel" and "Queen 4A Day" phrase are cut at 3 inches, while the "Rock Star" is cut at 4. The bags are simply small canvas bags I was able to get six for a dollar at my dollar store.

If you have not tried heat transfer vinyl yet, what are you waiting for?? The process is very easy and super gratifying if you like instant results. These goody bags were filled with all sorts of treats for the crafty little girl and were a nice surprise for the girls at the end of a great party.

Winding princess week down, but thank you cards are up tomorrow!

Wednesday, November 17, 2010

Mini Purse Table Favors

What's a party without table favors??

I absolutely love the Forever Young cartridge and I thought this was just the excuse I needed to use it! These were to go at each seat at the table, and they were filled with lip glosses and mini glitter nail polishes.

The crafty details:

These are one of the plain purse options and are cut at 4 and 1/4 inches because with some tweaking on the Gypsy I could get two to a page.  The paper is from DCWV Summer Dreams two-sided stack, which I absoloutely love, and so I had a really hard time deciding which papers to use. I will say the papers with glitter were much harder to cut and did not stay together as well as the non-glittered paper. I punched a hole in the front and decorated with some Prima flowers I got on clearance long ago, and some jumbo gem brads for Oriental Trading Company. (Just an FYI, when OTC says Jumbo, they mean JUMBO). The best part was they were simple and easy to put together - I probably spent more time picking out the paper than assembling.

Once again, the girls eyeballed them for at least an hour before they dug in, first there was plenty of discussion about which purse they would be picking, and then when I gave the go ahead,  the comparing of lip gloss and nail polish. And in case you were wondering, they did get some dancing and coloring in too.

On the schedule for tomorrow?? The goody bags of course!

Tuesday, November 16, 2010

Princess Party Week - Centerpieces

Time for the centerpieces!

Now initially we were supposed to have the party in the movie theater and the adjoining cafe area, so I had planned for a bunch of small round tables. Due to scheduling conflicts, we ended staying in the theatre area but I still was able to use all my centerpieces.
  
The crafty details:

These are target dollar pails, and I went back to using my frog prince, cut at 2 1/2 inches for one side. Since I was using vinyl (and had learned from the invites) I used my Gypsy to make sure that the legs were cut of out his tummy, instead of having to layer additional tiny leg pieces. But again, I used the white vinyl and some Martha Stewart glitter to give him some extra sparkle. I also used my I-rock on the crown for additional bling. 

On the reverse side, the happy birthday phrase is from Create A Critter, and cut at 1.60 inches , the number 5 is from from Sweet treats cut at 2 1/2 inches. I also uses the font crown from Once Upon A Princess cut at .60 inches and just layered it on top of the 5 at an angle. Again, that crown needed a little glitter sparkle, but by this time I had gotten tired of using the I-rock, so only one gem as the dot for the "i".

Then I filled the pails with lollipop flowers made from George and Plantin schoolbook, the flowers are cut at 3.75 inches, and are a fabulous idea I got from Kathy Orta. The Tiana decorations were supposed to be hanging ones that I got for like 99 cents at Oriental Trading Company, and I cut little slits in them and put them on sticks instead of wondering if there would be a place to hang them. 

These were also a hit and actually survived about 2/3 of the party before the girls busted into them...oh the slaughter.....at least they did admire them before throwing away my pretty paper!!

Up tomorrow - party table favors!