Showing posts with label Plantin Schoolbook. Show all posts

Thursday, November 17, 2011

Nemo Tags - Turning a Negative Cut Into a Positive

Today I am going to share with you a quick post about the tags I used on the goody bags for the party. These were pieces that were already cut from creating the invitations, which you can see here. These tags were the window in the invitation that was cut out for the acetate - and being the green person I am (and maybe a little bit cheap) - as I was peeling all those pieces off the mat I really did not want to throw out all that nice paper!


The details: 
So since my tags were already cut out by creating the invitation, all I had to do was gussy them up! I added a picture of Nemo and friends that I printed on a clear adhesive shipping label from Staples and cut out. This really is my favorite way to add text to my crafts - just a quick print and a stick and I am done! I use the large 8 1/2 by 11 size labels so I am not limited to any one size item - if I want to print two big things and one small on the same page I can. 

Then I cut some more of the coral pieces that are on the Best of Pixar cart, did a little hand trimming, ran it through the Xyron and placed it partially over the picture. And I finished off by stamping with a Fiskars stamp, had my daughter sign them, punched a hole and attached it to the pencil bag with some baker's twine. 

I was fortunate to find a Nemo school set at a local dollar store that I used instead of a traditional goody bag. They each had a necklace from this post, a lip gloss and nail polish, and a Finding Nemo watch that I purchased in bulk from this ebay seller. She has a variety of watches with different kids themes available like you can see in this listing and I had a really positive experience purchasing from her - great communication. The girls thought they were terrific and I was proud of myself for my restraint with the goody bag fillers this year. (Yes I do consider that restraint.) 

Saturday I will finish off Nemo week with the Mickey and Me Blog Hop where I am going to share the game I made for the party and some of the decorations! I hope you will join us!


Sunday, November 13, 2011

Disney Week begins - Nemo Birthday Invites!

This is going to be a Disney week here on my blog as I am going to share with you the creations I put together for my daughter's birthday party and ending in the Me and Mickey Blog hop. Last year she was all about the princess party, and you can see all of those creations here, but this year she decided that it was going to be a Finding Nemo swim party. This presented quite the challenge since Finding Nemo party supplies have been discontinued everywhere except for people trying to scalp you on ebay - so I had to get creative! And so we will being today with the invitations!

The details: 
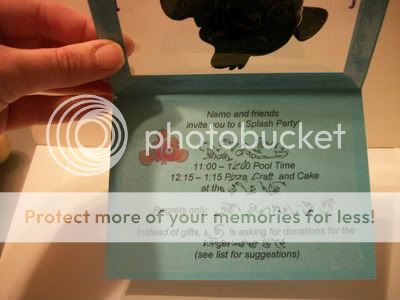
These are,  believe it or not, regular A2 size invititations, in fact just a wee bit smaller since I had to cut two out of each 8 1/2 by 11 sheet of paper. Those of you who are familiar with the Disney carts will maybe realize that layering the characters at such a small size is a HUGE pain in the behind, but I have a solution - and its name is vinyl! But first some closeups of each design - we chose four of the characters - and I made 8 of each design (because yes I am nuts).

Nemo - cut at 2.25 inches
Marlin - cut at 2.30 inches
Dory - cut at 2.50 inches
Pearl - cut at 2.25 inches
I created a Gypsy file with for my card bases that welded rectangles from Plantin Schoolbook with the waves shape I also found on that cart! Talk about hidden treasures! I wanted a cut out on the front of the card where I could put acetate and then my vinyl figure -I wanted the illusion of an aquarium.  And where did the acetate come from? I used almost all of my stash of the plastic clamshells that Cricut cartridges are packaged in ~ but don't you worry ~ I have worked on replenishing it since then. 

As I said earlier - the characters are cut quite small and I would not recommend doing that with paper because the vinyl made it easy to position the pieces and re-position if necessary. I did not however cut those teeny white eyes out - since I am not completely mad - instead I used a MS paint pen to add the whites for the eyes - worked wonderfully on the vinyl.

To frame the front I cut out some coral (which is also found on Best of Pixar) at 2 inches and flipped the image for the other side. I did a teeny bit of hand trimming on the coral since there was a little piece hanging over each edge. I also added a stamped sentiment from an Inkadinkado wooden stamp. I used Stazon because I was using Recollections brand shimmer paper (also used for the coral) and I wanted to make sure it didn't smear. 

For the inside of the invite, I printed out the details on clear shipping labels from Staples and then just stuck them to the inside. My daughter decided she was foregoing presents this year and asking for donations to the SPCA instead - so the pressure was on for a fabulous party!


Later this week I will share with you the necklaces I made for the goody bags and how I was able to use the negative cut from the invites for tags, and then the decorations and game for the party. Until then I hope you enjoy these - and maybe look into playing with some vinyl!
---Allison

Thursday, October 6, 2011

Animal Kingdom Layout

I have another Disney photo layout for you today. This one is from Animal Kingdom and I wish the picture came out better because I felt like these pictures fit in with the background paper so much easier than the other ones -at least as part of my planning process. 

The details: 

Of course this is the layout that I can't find my notes for *SIGH* but I am pretty sure the printed paper for the title is from Safari Kids and then I inked it pretty heavily with a green chalk. The font I used for "Animal" is the Roly Poly from Plantin Schoolbook and is cut at 1.50 inches. The "kingdom" is the font on Designer's Calendar and one of my absolute favs - it is cut at two inches and I welded the letters together on the Gypsy. 


That pretty much is it other than matting the pictures and adding my journaling. Pretty easy and another page in my album done! I should be done with it in about......10 years!! That's how it feels anyway! On a side note, tomorrow is Sketch Challenge Friday at Paper Craft Weekend Challenge and I absolutely LOVE the way my projects came out!! I really am getting much more done now that I have those weekly deadlines ahead of me - amazing what a little pressure will do. So if you get a chance pop on over and maybe you will want to play with us!

Saturday, June 25, 2011

Graduation Card and Pillowbox

I have a quick graduation gift set for you today - I have so many graduation parties this year I may need a second job just to support them all! I absolutely love easel cards and this is a card design I came up with last year - it was the first card design I really loved and it is still my favorite!

The details:
The card size is 4 1/2 inches by 6 inches. To create the easel card I took a strip of 4 1/2 by 12 inch paper and scored it at 3 and 6 inches. This gives you your easel backing.  Then I added a 4 1/2 by 6 inch restangle on top of the scoring (adhered to the bottom part of the easel backing) which means it can then be propped up by the inside (the white 3 by 4 inch rectangle). I guess that is not really very clear without pictures - but I do know there are directions for easel cards out there.

The grad cap is from Locker Talk - cut at  2.5 inches and the pop dotted on the front. I added a brad to tassel to make it look more like a real cap. The 2011 is cut from Elegant Cakes which has some great fonts on it - cut at 1.10 inches and welded together. I embossed the mat with my stars Cuttlebug folder. For the inside I used a MS corner punch and a Studio G stamp.

For the pillowbox I used Wrap It Up and cut it at 7.5 inches which is a good size to fit most gift cards. I did hide the contour of the front - which has a cut out of a diploma - mostly because I am not a fan of the outline shape - I would rather have something dimensional. Which is why I cut the diploma out separately at 1.50 inches but with only the first layer. (I wish somone would tell PC the colors they use in the new handbooks for layers are NOT inspiring.) I also did some "Cricut surgery" and snipped off the bow part of the cut so I could use some pretty twine instead. I used some mini glue dots to attach it to the front and the same Studio G Stamp.

Here are some of the cards I made last year with different school colors to give you an idea of how you can change it up a bit. The main difference is I used Plantin Schoolbook for the font.


Happy Graduation Season!

Sunday, November 21, 2010

Lollipop Flowers - How To

I love giving lollipop flowers as quick gifts - they are a nice treat and they look so pretty in a bouquet. Also a good use for paper that you like but not love. They do have a slight learning curve as you learn what works best for you  - but once you find what works best for you - so easy to crank a lot out.

First, you should know that this is a Kathy Orta idea, so therefore...
She also has a wonderful video on her blog, that you can see by clicking here. But if  you don't want to watch the video, or maybe can't right now (like you are at work, not that I EVER use the internet for personal use at work and I am sure you don't either), I have written out the instructions to make these flowers here with just pics.

The crafty details:

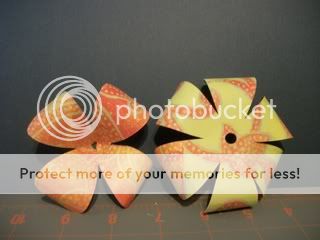
Each lollipop needs two flowers, and it works best if they are between 3.5 and 4 inches. I used Plantin Schoolbook for the flowers in these pictures, but you can definitely use George as well - in fact the last set I did I believe that is what I used - the only difference is the number of petals you get (4 and 6 with Plantin Schoolbook and 3 and 5 with George). 

You cut one petal off one of the flowers, and then overlap the two adjacent petals to close the space - basically altering it from 6 petals to 4. I use ATG tape to do this and haven't had any problem with them coming apart.

Next I use a pencil (or some such similar device) to curl the petals. Now it is time to heat up the hot glue gun! Potential burned fingers alert!!

You then gently work to slide the 4 petal layer onto the popsicle stick. Really it should be secure without adding glue to the lollipop base but you can if you so wish.  Then carefully (since I no longer have nerves left in my fingertips) apply a small amount of hot glue to the bottom of the first flower layer, and slide the bottom (6 petal) layer on the stick and slowly smush it (try not to get lost in the technical talk) into the first one. The smushing is necessary since the fit will not be as tight as the first layer but you really don't want to crease it to fit.


And that really is it! I am not going to sugar coat it - there is a slight learning curve - your first ones will not turn out as nice as your last - but I have found that the more you make, the easier it becomes. And I have found that to make them with George is a bit easier (less petals) than using Plantin Schoolbook, but that will also depend on how full you want to make them.

Before I forget - the plain clear wrapped lollipops - I found at the Dollar General  store, only a few dollars for a bag of 15 or so - not sure how they taste, but I love the way that they look and the colors they come in! I don't have to eat them so it doesn't really matter to me!

Well....what are you waiting for?? Get lollipop-ing!

Tuesday, November 16, 2010

Princess Party Week - Centerpieces

Time for the centerpieces!

Now initially we were supposed to have the party in the movie theater and the adjoining cafe area, so I had planned for a bunch of small round tables. Due to scheduling conflicts, we ended staying in the theatre area but I still was able to use all my centerpieces.
  
The crafty details:

These are target dollar pails, and I went back to using my frog prince, cut at 2 1/2 inches for one side. Since I was using vinyl (and had learned from the invites) I used my Gypsy to make sure that the legs were cut of out his tummy, instead of having to layer additional tiny leg pieces. But again, I used the white vinyl and some Martha Stewart glitter to give him some extra sparkle. I also used my I-rock on the crown for additional bling. 

On the reverse side, the happy birthday phrase is from Create A Critter, and cut at 1.60 inches , the number 5 is from from Sweet treats cut at 2 1/2 inches. I also uses the font crown from Once Upon A Princess cut at .60 inches and just layered it on top of the 5 at an angle. Again, that crown needed a little glitter sparkle, but by this time I had gotten tired of using the I-rock, so only one gem as the dot for the "i".

Then I filled the pails with lollipop flowers made from George and Plantin schoolbook, the flowers are cut at 3.75 inches, and are a fabulous idea I got from Kathy Orta. The Tiana decorations were supposed to be hanging ones that I got for like 99 cents at Oriental Trading Company, and I cut little slits in them and put them on sticks instead of wondering if there would be a place to hang them. 

These were also a hit and actually survived about 2/3 of the party before the girls busted into them...oh the slaughter.....at least they did admire them before throwing away my pretty paper!!

Up tomorrow - party table favors!