Showing posts with label Peachy Keen Stamps. Show all posts

Friday, December 9, 2011

Holiday Blog Hop & Snow Globe Ornaments

Hello all! Today is the Holiday Blog Hop for the BugBytes Design Team. This is your last stop on the hop and you should have arrived here from Melissa's blog, and when you are done, make sure to go back to Pam at TheBugBytes so that you can add your holiday project to the linky! If you are joining this party already in progress you can also start the hop with Pam's blog!

Apologies to my regular followers for being a bad blog mommy lately and neglecting my blog, I have projects done just no time to write the posts! And more apologies to the hoppers because I really love this project but it totally does not meet the requirements of having red or green or silver or blue. So what my migraine medicine is telling me is that I should go with my inner lawbreaker and say since there is purple in this project and red + blue = purple then this project qualifies. Yeah - let's go with that!!


The details: 

This is a snowglobe ornament that I picked up at Michael's  - they come in two pieces and allow you to place something in the middle. I decided that they were dying to be made into snowglobes and I have had this idea for a long time - so glad it actually worked out! This is also another one of my "recycling" projects because I used my cartridge clamshells as the center of the ornament! (I have a few clamshell pieces....or perhaps a alot). My original photos are taken on my daughter's purple Christmas tree so I thought I would take some without the distracting background so the directions would be clearer.

 I cut a 3.05 inch circle out of the clamshell using my Gypsy - and yes it has to be that size - 3 inches is too small and 3.10 is too big and then placed a 2 inch snowman from Winter Frolic cut in vinyl with some of the layers on one side of the plastic circle. I flipped the image and all the layers and placed the other snowman on the other side of the plastic circle, layering it as exactly as I could over the first snowman. I stamped two different snowman faces using my Peachy Keen Stamps and Stazon ink and colored in the nose with an orange sharpie. I felt like he needed some bling and I especially appreciated I could use two different kinds - one for each side! Who wants buttons when you can have MS mini bling??

I added some Martha Stewart snowflake glitter to one half of the ornament, placed the circle over it, added glitter to the other half and sandwiched them all together. I did add some glue to the inside rim but I am not sure a) that it was necessary or b) that it really worked. Since this was going in my daughter's room I mixed some glow in the dark glitter with the snowflake glitter too, but you can only see it when the lights are out. Oh well - it was still fun!

This project just reinforced my love of vinyl + acetate - they are a match made in crafting heaven! My only regret is I only bought two of these ornaments which means a trip to Micheals is now a necessity and I don't know when I will have the time! I will strive to post my other snowglobe ornament next week.

Make sure you go back to Pam at TheBugBytes and particpate in the linky party! And in case you need it, here is the full blog hop list:

  1. Pam 
  2. Jeannie  
  3. Jen 
  4. Carole
  5. Lisa Brooks 
  6. Audrey  
  7. Mila
  8. Sheila aka sassylady 
  9. Elizabeth 
  10. Kelly Millet 
  11. Dayna Sabrina 
  12. Lori   
  13. Denine Vajja
  14. Melissa 
  15. Allison - you are here! :)    


I hope you found lots of inspiration and have a wonderful holiday season! Happy crafting!


Tuesday, August 16, 2011

One of a Kind Card


Hello everyone! Today is my day on The Bug Bytes - I have a simple card to share with you today and for once I am not embarrassed by one of my cards.  I made this for a dear friend and I can't wait for her to get it in the mail!

The details: 

I have been dying for Preserves forever and I finally indulged myself in one of the last cricutmachine.com sales. I don't know why I wanted it so badly - this card must have been in my head wanting to get out! Then when I got the K and Company Citrus Bliss paper stack at Joann's I decided it was card destiny! That's a real thing right??

I cut out the grapes with all layers at 4 inches and used papers from my scrap paper stash. I wanted to add some more dimension to all the flat papers so I inked all of the layers before assembling. I was very pleased with how the leaves turned out. A closeup of the bunch:


 For my "one of a kind" grape I cut a circle at 0.70 inches from George and Basic Shapes. I used the layers feature on my Gypsy to figure out what would be the right size. Then I stamped with a Peachy Keen face stamp, added a touch of glossy accents to the eyes and pop-dotted it on the front. The card base from DCWV while the purple background paper as well as the sentiment stickers are from the K & Company Citrus stack.

On the inside I think I am going to add "...is the kind of friend you are!" and pop it in the mail with a little treat.  I haven't forgotten my promise to show you the recycled popcorn boxes - that will be next!

Wednesday, July 27, 2011

Cricut Marker and Shrinky Dink Tutorial

Christmas in July is continuing here with a tutorial of how to combine the Cricut Markers with Shrinky Dinks for a whole bunch of fun and some cute projects! I decided to make a snowman charm using Winter Frolic and you really can make anything  - but it tends to be easiest when the cut has a shadow layer. I also have written these directions for someone using the Gypsy. I do not know if the layers would line up correctly using the "old fashioned" method.

The details:

I begin with my snowman shape on one layer, and the shadow directly behind it on the second layer.

You can also see I added some circles from George to create a spot for the finding to go through. (I need to resize them - I thought they were a little big for the final product.)

I put my marker in the machine, set for low pressure, and "cut" the first layer which draws the outline of the snowman for me.


This next step is important, instead of unloading the mat, I select Return to Design. If you unload the mat, the design won't be centered.


I move to the second (shadow) layer of the gypsy design. Then I swtich out the marker for the blade housing and change the settings. The settings that have worked best for me are: Blade depth 6, Max pressure, and Multi-cut of 2.


This cuts out the shrinky dink around my image and gives it a nice border, resulting in this:


Now I am ready to decorate and color my snowman  and make him adorable.  Here he is all ready to be baked.


I used a Peachy Keen stamp with Staz-On ink, I used Sharpie markers for the hat and gloves, and some watercolor pencils for the nose and cheeks. I put him in the toaster oven at 325 degrees until it curls up and then lays flat, which brings me to my final product.


I started out with a three inch snowman and my final charm is about 1.5 inches and (I think) super cute!. I hope the directions are clear and encourage you to start cutting and shrinking!

Tuesday, July 19, 2011

Summer Fun Goody Bags!

Hi everyone! I am thrilled to be here at The BugBytes, and I decided to bring  you what else? Some goody bags that I created for my daughter's kindergarten class. The last two years I have been fortunate enough to find enough good deals on books that I could provide every child in her class with 5 books to take home for the summer, and these are what I designed to house them! (Can you tell I really really believe in summer reading?) And of course I threw in some other summer fun goodies like bubbles and mini paint kits and various other goodies.

This post must come with a disclaimer - do as I say not as I do! Why you ask? Because while cutting sandpaper is a good idea in theory - in actuality it is not only a PITA, it killed my first machine. She never quite recovered and no amount of resets could save her. *bowing head for moment of silence*


The details:
Now that I have given you the official disclaimer, you should know the sand castle is cut at 4 inches from Create a Critter, with the top layer being sandpaper (really people - steal it out of the kids sandbox and xyron it) and the bottom being craft paper. The whole thing is on an action wobble - because that made the packaging fun!

 
The wobble in action!
The sun is also from Create a Critter cut at 2.50 inches, except I replaced the top layer with a 1.5 inch circle from George and a Peachy Keen Stamp. I chalked the cheeks of the sun and also used stickles around the the outside layer for the sparkly effect. I finished the bags off with some MS word art printed on clear labels and adhered to the bag.

The best part is that I loved these bags so much I made coordinating tags to go with the teacher goody bags - which contained a class picture candle and a mini spa kit full of items to help the relaz and rejuvanate!
In the case of the tags, I only used the bottom layer of the sand castle cut on kraft paper (I was tired of fighting with sandpaper - remember -good for distressing, bad for machine) and I put the sun on an action wobble - because I really do love those things. They provide me with so much joy and entertainment! I finished the tags with a Fiskars stamp and had my daughter sign them and attached with some baker's twine. Easy and adorable! That's all for me this month at The BugBytes - see you in August!

Monday, May 9, 2011

More Teacher Appreciation

I know that Teacher Appreciation week is officially over BUT the end of the school year is fast approaching so in case people are wondering what to make that will be useful and easy on the budget - here are the rest of the goodies I put together for my daughter's teachers. There are 6 teachers/aides in her class on a regular basis so they all deserve a treat! Each received a bookmark (the ones from this post) and then I made each a large altered wooden clothespin clip. I thought these would be great for them to use to hang up memos and reminders. I was able to use some of the older carts that I have been neglecting and they are definitely oldies but goodies - and as a bonus I have submitted it to the Circle Magazine challenge!

Here is one set:


All wrapped and ready to present:


A side view so you can see the clip from the side:
All of the clips done:

All of the bookmarks:


The details:

The wooden clothespins I found at ACMoore for I believe $1.19 each, and I hot glued a strong magnet to the back. The polka dot paper is the new Recollections paper from Michael's and comes in a variety of colors. The ribbon was Joann's brand and adhesive backed. Sorry - nothing from Hobby Lobby!

I cut a rectangle of paper to match the front of the clothespin and glued it on. Then I cut a pencil from Locker Talk - at about 6 inches - until it was approximatley the height of the pin. The apple (2.5 inches) with their names on it is from Doodlecharms and I cut it with all the layers and a white blackout piece for the back. After glueing the apple on I mod-podged the whole thing so it would last and be a little bit sturdier.

I used the extra paper to wrap the bookmark and then cut another apple (1.5 inches)  from Create A Critter, using the Gypsy to hide the contours of the face, and then stamped with a Peachy Keen Stamp. It is the Princess set and I just love them - too cute!

For the tag, more of the same paper, and I found this scalloped tag on Christmas Cheer (of all places!) and cut it rather large at 4 inches. This is because I knew my daughter would have to sign the apple and I wanted it to be large enough for her. I then cut the same Doodlecharms apple (3.5 inches) but with just the base cut - and I used chalkboard paper! How cool is that?? It cuts like a dream in the Cricut too.  Then I had my daughter sign in chalk just for more fun, and wrapped them all up with coordinating ribbon.

The teachers really loved them and my daughter is always so happy to give them a treat I think this earned a spot on my repetoire of craft gifts. I may have one more teacher gift post before the school year is done, and then back to the Disney scrapbook grind!

Sunday, May 1, 2011

Some quick teacher gifts

I have been busy with a play and Teacher Appreciation Week snuck up on me without a lot of warning, but I have a few ideas to share with you if it crept up on you too! My daughter is in an inclusive kindergarten classroom so there are many teachers and aides that I like to remember in some small way so I am always on the hunt for a cost effective thank you!

I was at the local Dollar Tree and spotted these metal bookmarks in the craft section, and I was very impressed with the quality of them (almost as much as the price!).


With some scrap paper, ribbon, and a cricut cut they are instantly turned into a pretty gift!

The details:
The apple is from Create a Critter and I hid contour on the face of the top layer, and instead used a Peachy Keen face Stamp. It was cut at 1.5 inches. The plaid paper is perhaps from a DCWV fall stack (it was from my scraps drawer so not entirely sure) and the ribbon is by American Crafts.

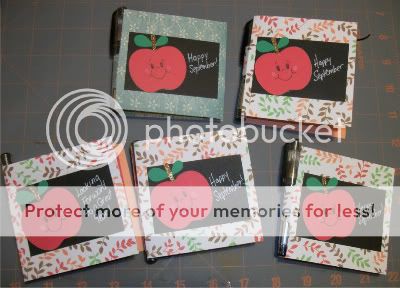
This project reminded me of one I did in September with the same apple, and I think it would be a wonderful teacher/aide gift this week. These are Post It Holders and you can see a tutorial I did on them here (you would just skip the parts pertaining to the shaker fronts. I believe these apples were probably at least 2 inches but I really have no idea! I used black paper and white pen to simulate a chalkboard effect.


Well I hope you got an idea or two and made it worth your visit! No more plays until the next school year which means more time to craft!

Monday, December 13, 2010

Shake It Up Baby Now! Post-it Holder

I am really in love with this next project, especially because it combines two of my obsessions - post it holders and shaker cards! I am going to feature a number of these this upcoming week, as I think these will be my gifts to my colleagues for this holiday season.


The crafty details:
I started out with a 7.25 by 3.5 inch rectangle for the base. Using a score board you score at 3.5 and 4.25 inches. Then between the score marks make two slits with a razor for the pen.

The top layer of the front is a 3.5 inch square with a 2.5 inch square cut out in the middle, and a layer of plastic behind it. The clear plastic is from the clamshell that the Cricut cartridges come in! Don't you just love recycling? I cut them apart as I load and link my cartridges and re-use the plastic in my projects.

My snowman was cut at 2.95 inches and he is from Winter Frolic. I cut the bottom layer  of the snowman as he wouldn't have any facial features so I could use my Peachy Keen Stamps (they were feeling neglected). I tied a little chiffon ribbon around his neck for a scarf and sealed it with a heat set gem using my I-rock.

Then I outlined the outside of the top layer with some foam tape, and placed some Martha Stewart snowflake glitter (which I am love in with and want to use on everything) in the center and very carefully placed the two layers together.

The post-its I got from Staples a few weeks ago when they were 12 for a dollar (and this was accomplished by totally stalking the store waiting for them to get a new order in before the sale was over and bringing my daughter with me so she could get some too) and the mini pens are from the Christmas section in Walmart.

Stay tuned over the next few days for more shaker post-it holders! I am working on a pic tutorial so you can spread the shaker love!