Showing posts with label Vinyl. Show all posts

Tuesday, July 31, 2012

Monogram Lunchbox (subtitled yes I am alive)

I guess you know it has been a long time since you blogged that Blogger actually changes while you were gone. Long story short (which we all know is NOT my strength) it was a crazy busy year and something had to give - and that was blogging first and crafting second. And while I have slowly been finding my craft again - seriously my Gypsy skills are so bad I mock myself - I haven't wanted to stress myself about blogging. No promises I can be a regular blogger - but when I have the time I will try. You can catch me in the June Birthday edition of Cricut magazine if you miss me badly enough!

Shameless promotion aside - here was a quick and easy gift "bag" I made for a birthday party my daughter was attending. I used a plain metal lunchbox that unfortunately my ACMoore does not carry anymore, some vinyl and some heat set gems studs.


I used the Monogram font from Wall Decor cut around 4 inches if memory serves and them then embellished the various heat set pretties. Excuse the sad bow tying, but if you are a follower you know that is not a strength. This was the perfect size for the gift which was a paperback book and a gift card, and my daughter was excited to bring it because it was unique. I liked it because it it won't get thrown out and she will get to use it again. If anyone knows of any store that still carries these - let me know - I would love to pick up some more.

Tuesday, January 17, 2012

Valentine Ribbon Plate

Happy New Year to my poor neglected followers! I haven't forgotten you, I am just entering my busiest time of the year, and I am meeting my obligation for The BugBytes today, and I wanted you to know that I am still alive but that I will definitely be hit and miss for the next few months.

I actually had another project done and photographed and because I am nuts decided that it was the wrong time of year for that particular project and to make this instead - so I will be sharing the other project next month or the month after. I have had ribbon plates on the brain since my friend Dayna posted this one a few months ago, and was lucky enough to pick up some small ones at Hobby Lobby on my last trip.And after the ease with which this project came together,  I can definitely see some more in my future!


The details: 
The image is from LoveStruck 2010 and is cut at 3.75 inches out of red vinyl. I will admit I had to cut it a few times before I got a clean cut, but it had been a while since I had replaced my blade. In fact, the longest part of the whole process was attempting to cut the image twice before biting the bullet and getting a new blade out (this is about where the mumbling and grumbling started too but that's another story). A new blade was just what I needed, and then it was actually very easy to weed the image, place painter's tape over it and transfer it to the plate. 

I thought the American Crafts XOXO ribbon I had on hand was a nice fit with the image, and I used about a 42 inch length of ribbon, which went all the way around the plate and gave me plenty left to hang the plate. I tied a knot in the back and then a bow at the top which I did not photograph for fear you would all laugh at my sad bow skills. 

This really was a simple and easy project - in fact  - I am sure this blog post has taken longer than the project did! If I am not a frequent poster over the next few months, I haven't forgotten you - just that pesky life getting in the way - I will be back!


Pin It

Tuesday, December 20, 2011

Another Snow Globe Ornament


Hello everyone! It's time for my monthly post on The BugBytes and I am going to share with you another snowglobe ornament, like the one I made for the blog hop, but this one is a little more grown up. I also took a few more pictures so hopefully it is clearer how it all comes together!

 The details: 
So this is a very similar process to my previous post, I begin with a two piece ornament from Micheals and a  3.05 circle cut out of a recycled cartridge clamshell. Then I placed my scene on the acetate with black and white vinyl. The Santa (1 inch), trees (1.80 inch) and the church (1 inch) are from the Christmas solutions cartridge. I cut each image twice (once regular and once flipped) so that it looks the same from both sides. So this is what it looks like before I assemble it.


I filled the two halves with snowflake glitter and then I get ready to place the acetate inside. In this picture you can see there is an inner lip where the circle will fit (ignore badly manicured finger):


The circle fits in perfectly cut at that size and then I have one half of my ornament complete. 


And then I carefully slide the other side of the ornament in and add a ribbon to the top to keep it together. I didn't think it was necessary to add glue until I came home and saw what my two year old had done to it when my husband was "watching" her *SIGH* all that wasted glitter.


Apologies for the bad picture, but I think Yukon Jack is peeking out there to say hi! I hope these instructions help in understanding the process a little better and I really hope there are some of these left on clearance by the time I get to Michael's again!

Friday, December 9, 2011

Holiday Blog Hop & Snow Globe Ornaments

Hello all! Today is the Holiday Blog Hop for the BugBytes Design Team. This is your last stop on the hop and you should have arrived here from Melissa's blog, and when you are done, make sure to go back to Pam at TheBugBytes so that you can add your holiday project to the linky! If you are joining this party already in progress you can also start the hop with Pam's blog!

Apologies to my regular followers for being a bad blog mommy lately and neglecting my blog, I have projects done just no time to write the posts! And more apologies to the hoppers because I really love this project but it totally does not meet the requirements of having red or green or silver or blue. So what my migraine medicine is telling me is that I should go with my inner lawbreaker and say since there is purple in this project and red + blue = purple then this project qualifies. Yeah - let's go with that!!


The details: 

This is a snowglobe ornament that I picked up at Michael's  - they come in two pieces and allow you to place something in the middle. I decided that they were dying to be made into snowglobes and I have had this idea for a long time - so glad it actually worked out! This is also another one of my "recycling" projects because I used my cartridge clamshells as the center of the ornament! (I have a few clamshell pieces....or perhaps a alot). My original photos are taken on my daughter's purple Christmas tree so I thought I would take some without the distracting background so the directions would be clearer.

 I cut a 3.05 inch circle out of the clamshell using my Gypsy - and yes it has to be that size - 3 inches is too small and 3.10 is too big and then placed a 2 inch snowman from Winter Frolic cut in vinyl with some of the layers on one side of the plastic circle. I flipped the image and all the layers and placed the other snowman on the other side of the plastic circle, layering it as exactly as I could over the first snowman. I stamped two different snowman faces using my Peachy Keen Stamps and Stazon ink and colored in the nose with an orange sharpie. I felt like he needed some bling and I especially appreciated I could use two different kinds - one for each side! Who wants buttons when you can have MS mini bling??

I added some Martha Stewart snowflake glitter to one half of the ornament, placed the circle over it, added glitter to the other half and sandwiched them all together. I did add some glue to the inside rim but I am not sure a) that it was necessary or b) that it really worked. Since this was going in my daughter's room I mixed some glow in the dark glitter with the snowflake glitter too, but you can only see it when the lights are out. Oh well - it was still fun!

This project just reinforced my love of vinyl + acetate - they are a match made in crafting heaven! My only regret is I only bought two of these ornaments which means a trip to Micheals is now a necessity and I don't know when I will have the time! I will strive to post my other snowglobe ornament next week.

Make sure you go back to Pam at TheBugBytes and particpate in the linky party! And in case you need it, here is the full blog hop list:

  1. Pam 
  2. Jeannie  
  3. Jen 
  4. Carole
  5. Lisa Brooks 
  6. Audrey  
  7. Mila
  8. Sheila aka sassylady 
  9. Elizabeth 
  10. Kelly Millet 
  11. Dayna Sabrina 
  12. Lori   
  13. Denine Vajja
  14. Melissa 
  15. Allison - you are here! :)    


I hope you found lots of inspiration and have a wonderful holiday season! Happy crafting!


Sunday, November 13, 2011

Disney Week begins - Nemo Birthday Invites!

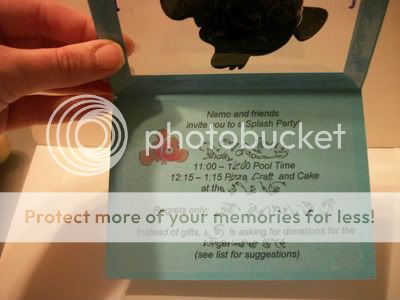
This is going to be a Disney week here on my blog as I am going to share with you the creations I put together for my daughter's birthday party and ending in the Me and Mickey Blog hop. Last year she was all about the princess party, and you can see all of those creations here, but this year she decided that it was going to be a Finding Nemo swim party. This presented quite the challenge since Finding Nemo party supplies have been discontinued everywhere except for people trying to scalp you on ebay - so I had to get creative! And so we will being today with the invitations!

The details: 
These are,  believe it or not, regular A2 size invititations, in fact just a wee bit smaller since I had to cut two out of each 8 1/2 by 11 sheet of paper. Those of you who are familiar with the Disney carts will maybe realize that layering the characters at such a small size is a HUGE pain in the behind, but I have a solution - and its name is vinyl! But first some closeups of each design - we chose four of the characters - and I made 8 of each design (because yes I am nuts).

Nemo - cut at 2.25 inches
Marlin - cut at 2.30 inches
Dory - cut at 2.50 inches
Pearl - cut at 2.25 inches
I created a Gypsy file with for my card bases that welded rectangles from Plantin Schoolbook with the waves shape I also found on that cart! Talk about hidden treasures! I wanted a cut out on the front of the card where I could put acetate and then my vinyl figure -I wanted the illusion of an aquarium.  And where did the acetate come from? I used almost all of my stash of the plastic clamshells that Cricut cartridges are packaged in ~ but don't you worry ~ I have worked on replenishing it since then. 

As I said earlier - the characters are cut quite small and I would not recommend doing that with paper because the vinyl made it easy to position the pieces and re-position if necessary. I did not however cut those teeny white eyes out - since I am not completely mad - instead I used a MS paint pen to add the whites for the eyes - worked wonderfully on the vinyl.

To frame the front I cut out some coral (which is also found on Best of Pixar) at 2 inches and flipped the image for the other side. I did a teeny bit of hand trimming on the coral since there was a little piece hanging over each edge. I also added a stamped sentiment from an Inkadinkado wooden stamp. I used Stazon because I was using Recollections brand shimmer paper (also used for the coral) and I wanted to make sure it didn't smear. 

For the inside of the invite, I printed out the details on clear shipping labels from Staples and then just stuck them to the inside. My daughter decided she was foregoing presents this year and asking for donations to the SPCA instead - so the pressure was on for a fabulous party!


Later this week I will share with you the necklaces I made for the goody bags and how I was able to use the negative cut from the invites for tags, and then the decorations and game for the party. Until then I hope you enjoy these - and maybe look into playing with some vinyl!
---Allison

Sunday, September 18, 2011

Vinyl Birthday Wrap

Yes that's right - I used vinyl on wrapping paper! I really like to alter plain bags for birthday presents (and now my daughter seems to expect it every time she attends a party) but this time the gift was too big. So what to do but decorate some plain wrapping paper for the occasion! And it didn't come out perfect but I can totally deal - it was ending up in the trash anyway.

The details: 

This party had a carnival theme so it was a good excuse for me to use my Carousel Lite Cartridge for the first time. Now for some reason it would not link to my Gypsy no matter what I did  so I had to do this the old fashioned way. And after a bit I actually remembered how to use my Expression without my Gypsy! I cut the clown at 11 inches and the letters for the name at 2 inches. His legs look a little wrinkly because once you put that vinyl down on paper - it is stuck there! I layered the letters before I put them on the package and then placed them on to look like the clown was juggling them.

As I said, it didn't come out perfect but I am learning to accept the tiny imperfections. I even had time to make something else for the birthday girl - but that will be my next post!

Monday, September 5, 2011

College Survival Kit

Happy Tuesday! Today is actually a sad day for me - as it is back to school for me *sniff*.  But it is also Technique Tuesday over on Paper Craft Weekend Challenge, and Caroline has a great tutorial on embossing. There is also blog candy - so you should definitely check it out! I spent part of my last day of summer vacation *sniff* creating this container to send to my cousin (and former student) who just went off to college. She is at the Ranger School so there is no cell phones, limited internet access, basically stranded in the wilderness! So of course I think a big priority box full of chocolate is just the thing to make her feel better!

The details: 

I found these nice plastic containers at the dollar store a while ago, and I thought they would be great for snacks and stuff - we have my daughter's markers in another one - so they are versatile. I used some dark green vinyl and laid out the design completely on my Gypsy before cutting, that way I could transfer it in one piece. The trees are actually from the Christmas solution cartridge and they are cut at 3.5 inches real dial size. (Without real dial size they are teeny!) The font is from Nursery Rhymes and all the letters are cut at 1 inch. Once the vinyl was cut and weeded, I laid down my painter's tape overlapping a few pieces and placed it on the container! Easy peasy and very quick! Here is what it looks like full of goodies:
And I will admit it - I went a little overboard on candy so there is another gallon freezer bag of goodies to accompany this - but hey - candy has no calories when you are in college right?? Well, still time to cry into my pillow the school year is here - but I will get over it I suppose SIGH. Maybe some chocolate would help...

Friday, August 12, 2011

Candle Table Decorations

Now we are on to the table decorations - I wanted them to be elegant but still fit in with our casual party setting. I also love putting pictures on candles and I couldn't wait for everyone to see my parent's wedding photo.


The details:
For the candles, I created a simple "40" using shrinky dinks and then colored itt with a red stamp pad. The trick is to mold the shrinky dink to a glass right when you take it out of the oven so it holds to the candle better. Then I simply attached it with mini glue dots. 
 
For the candle holder I found these wonderful heart shaped glass bowls at the Dollar Tree - with some vinyl and some red gems they turned out fantastic.
I used the Elegant Cakes font as well as the "anniversary" phrase  - which I think is so lovely with all the scrolls - and much easier to cut out in vinyl than in paper. I laid out the phrases as I wanted them on the Gypsy, grouped them, and then re-sized them to be under two inches to fit on the side of the glass bowl.

I think finally you are ready to see how everything looked at the party!


I hope these have inspired you for your next anniversary occasion, and remember next week I will show you how I took the leftover popcorn boxes and re-purposed them for another baseball picnic!

Wednesday, August 10, 2011

Simple "40" Favors

Well of course I couldn't let there be just one type of favor at the party, could I?? So if you take another look at yesterday's picture, there were a few sweet treats in there for the guests with a sweet tooth. I had to keep them simple as well - since I was running out of time!


The details:
I found some red cherry gummy slices at the grocery store - so to make this favor, I put two in a bag, cut out a blackout shape at 4 inches from Elegant Edges and added my welded "40" from Elegant Cakes. I believe I didn't mention in my last post that I used red vinyl for all the "40"s on my favors. It cuts beautifully and I don't have to worry about adhesive  - it works as your own quick sticker!


I also filled these clear plastic tubes with red and white M and Ms. I have been obsessed with them ever since I saw them on the Circle blog , and I was fortunate enough to find them at CKC Buffalo (although I have seen them at ACMoore too!). These were a huge hit with the kids.

I simply added a white vinyl belly band and added a "40" in the center. I did change it up a little and I used the zero from Wall Decor and More because I wanted to have the scrolly tail on the end. They were so easy to throw together and I am dying to find more of these at a great price! If you come across a super deal - we could be new BFFs!

Up next will be the table decorations, more red and more vinyl , but that probably doesn't surprise you by now!


Wednesday, July 27, 2011

Vinyl Scraps Winner!

And the winner of the vinyl scraps is.... Rita! Rita if you could shoot me an email at goodybagdiva@gmail.com and give me your address that would be great. I actually probably have it around here - but am in the midst of craft room cleaning so it would be way more efficient just to get it again. I hope everyone is still inspired to try vinyl! It is fun and addiciting!

Saturday, July 23, 2011

Christmas in July Vinyl Tutorial

Hello followers - Merry Christmas! Yes I know it is rather early but in the crafting world Christmas does seem to fall in July doesn't it? (And for those of you who may have expected  an emotion filled rant for my next post- sorry - not my style. And to my non-circle followers - ignore these parentheses!)

So in case you didn't know, I heart vinyl! All types of vinyl really but today I am bringing you a tutorial on how to create a great ornament using sign vinyl - and the best part? It takes hardly any time at all!
The details:
I began with my supplies: scraps of sign vinyl (Orcal 631 - I get them from a sign shop), painter's tape (to act as transfer tape), a ceramic ornament, and my vinyl tool (but you can also use your Cgull scraper tool).


Next I laid out my vinyl on my mat and smoothed it down using my tool. You will see white vinyl here and not in the finished product because I had planned on using it but then changed my mind. Using the tool to apply it to the mat gives you a nice smooth surface to work with and ensures a nice cut.


I always have cut vinyl using 3-3-3 settings on my machine and have never had a problem. After cutting my design, I weeded off the excess which just means I picked out all the little excess scraps.


The "Let it Snow" is from Winter Frolic and cut at 2.10 inches. The snowflake is from Joys of the Season and cut at 2 inches. Now, technically you should use transfer tape for all layers but for the phrase I just used my fingers to add the dark blue letters and then placed my transfer tape over it, again smoothing over the top with my vinyl tool.


It should then lift off pretty easily, and this allows you to place it on your ornament.

Again, smooth everything down on the surface and then slowly peel away the tape. You should have your design in perfect shape on your ornament! (and psst! it if tears a little - no worries! vinyl is very forgiving - just smooth it down!)


Of course I added some Martha Stewart bling with some glue dots and replaced the ugly gold thread with some delicious Trendy Twine for the final product.


And for the back of the ornament? I will admit I used a white transfer tape so that I could more easily see to  layer the vinyl but I also think clear contact paper would work the same if you want to try tricky layers. I think I would just make the contact paper a little less sticky first by applying it to my clothes or the rug first.
Here is how it turned out:


Wasn't that easy? It would have taken me under half an hour but I had to stop and keep taking pictures. And if you are looking for another idea that combines vinyl and ornaments, you can use it etching cream and come up with a final product that looks like this:

All I did in this case was place my vinyl on the ornament, cover the rest of the space with etching cream, and let it sit! All that was left to do was wash off the cream and peel off the vinyl and I was done!

If you still haven't had enough of vinyl and ornaments you can check out this post - where I used it with the infamous Glitter Balls.

I would love to give away some vinyl scraps to someone who wants to play! Leave me a comment and I will pick one person on July 26th to get an envelope filled with some vinyl all ready to use. (Please know - these will be odd-sized pieces of various colors - not new vinyl sheets.) Oh and even though it is 90 degrees outside - Merry Christmas!

Thursday, May 19, 2011

Disney Safari Pages & A Mini Giveaway!

I promised I would get back to layouts and here we are! I have been diligently working on my Disney album, and what works best for me it to plan ahead. I spent about a week putting together sketches with pictures and paper so I was prepared to attend my last all day crop and be productive! And I was - eleven pages done and in the book! Only a million more to go....*SIGH* it just feels that way sometimes! These are some pages of the pictures I took on the Kilimanjaro Safari at Animal Kingdom.


The details:

For these pages, I used DCWV Safari Kids stack, which I just picked up recently and absolutely love! I used the Zoo Story Lite cartridge for the title :

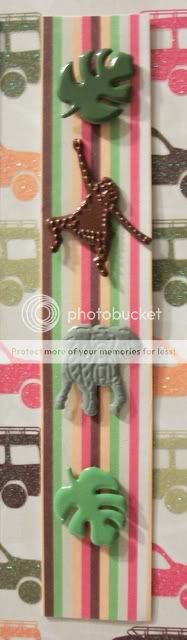
I used vinyl to cut out the "Kilimanjaro" because at 1 inch I knew they were going to be a pain to cut and adhere if I used paper! Vinyl made it a cinch! The Safari is cut in the font with the Shadow at 2.5 inches. I know it may be hard to see on the picture  of the layout but in the corner I used a spare strip of paper decorated with some brads from Eyelet Outlet. They have the cutest brads and I am totally addicted!

On the second set of pages I used my Cricut for the film strips. That cut can be found on Mickey and Friends, and I used by Gypsy to hide contour of the inner cuts so that I could place my pictures there instead. Then I welded two of them together slightly overlapping and cut as one long strip. The side one is cut at 3 inches and fit five 2x2 pictures. The larger strips were cut at 5.5 inches and I moved the cut over to the side of the page to cut the strip on the leftt, then cut it as a whole for the right page. The letters are not Cricut (*gasp*) they are chipboard with a wood grain font on the front.


I do have some extra letters that I cut out - the word "safari" in the Zoo Story font (without shadow) at 3 inches - once in the cheetah print and once in the gold cardstock - and they will go to the first person to email me about them! Only seven more pages to write about!

Tuesday, May 17, 2011

More Teacher Gift Ideas

Hi everyone! Happy to be once again at TheBugBytes today! While Teacher Appreciation week is past, I thought I would share these altered mini chalkboards with you in case you were looking for a nice end of year treat! I made one each for her music, art, and PE teachers. I found them at ACMoore for around a dollar apiece - with some vinyl, paper, mod podge, and some magnet strips to the back and they turned into great gifts!


The details:

For all three I used my gypsy to plan out the sizes of the lettering and shapes. I set up Layer 1 with two rectangles in the same measurements as the chalkboard and used the subsequent layers to plan each board. The names are in vinyl to make sure they stick while I used paper for the shape cuts.

The music teacher's board I used Hannah Montana for both the name and the cuts.I nudged each of the letters together some more on the Gypsy so that it cut as one piece and wasn't too long. And yes, it was as big a pain in the butt to weed and put on there as it looks! But I was very happy with the results.  A closeup of the music notes:

I cut them using DCWV new Performance stack which I just love, and then applied a thin layer of modpodge to the top and the back edges that hung over the sides.

For the art teacher's board I used Hannah Montana again for the font, and while I was not crazy about that color vinyl, my daughter had veto privileges and she liked it. The brush and palette are from Locker Talk  - I am really trying to use my older cartridges and find those hidden gems! I used stickles instead of cutting the paint circles, and added some to the brush. I think it came out really nice! (and you can modpodge over stickles in case you were wondering like I was) A closeup:


Now the PE teacher chalkboard has a story connected to it - I asked about the teacher and was told that she was "really really sick - she's been out for a looooooong time - I am worried about her Mommy". Well, after a quick call to the school secretary I discovered what I had suspected - she was on maternity leave! But the secretary didn't remember the name of the substitute so a generic "sporty" theme chalkboard had to suffice!

I used Car Decals for the font, and Sports Mania for the 4 corners - another oldie with hidden gems! The cuts already had the corner shape built in so I knew that it was Cricut fate! I went into a little more detail on the different shapes. I used the Cuttlebug mesh folder on the football and basketball, and inked the baseball and soccer balls. Some closeups so you can see what I mean:


I also loved the way they turned shiny after the mod podge! I did get good feedback via thechild (although now I wonder about her school stories) so I hope they liked them. We shall be back to the layouts soon!