Showing posts with label Mini Monograms. Show all posts

Monday, August 8, 2011

Fortieth Anniversary Extravaganza

I have a few posts for you this week - it was my parents' 40th wedding anniversary this year - and so I had a lot of fun creating table decorations and favors. Forty years is the Ruby Anniversary - which means a lot of red and white ahead! They are season ticket holders of the local minor league baseball so we had it at the ballpark under the party tent - they really enjoyed themselves and it was the perfect laid back party!

The details:
The focus of today's post is going to be the popcorn boxes, which are cut from Tags, Bags, Boxes, and More.

These were cut at a 6.50 inches which I rotated by 80 degrees on the Gypsy. By doing this I could fit one box on one piece of 8 1/2 by 11 paper. Then by trimming the paper 1/2 inch I was able to put 3 sheets on one 12x24 mat and cut them out 3 at a time. Since I was making 30 of them, this was an important detail.

The popcorn box has no layers, and when I cut it out in plain red they really didn't do anything for me. I really wanted to add the white border and it was not going to be productive to cut out each box twice just for that. Instead I put the popcorn box on one layer and then designed a border layer using circles and rectangles from George.
By repeating this pattern I made a pattern for a liner that ultimately resulted in a white border at the top of the box.


The "40" is cut from Elegant Cakes at 1.50 inches while the scallop is from Mini Monograms at 2.50 inches. I filled them with bags of peanuts and homemade cinnamon sugar popcorn. They were a great success and the peanuts went much faster than I expected. Don't worry though - I took care of all that extra popcorn.

In the end, I had made way more boxes than I ended needing, but don't worry - I found a great way to re-purpose them - and you should look for a post next week to see how they turned out in their second life. Stay tuned for more red and white!

Thursday, January 27, 2011

Sour Cream Containers + Shrinky Dinks = Great Baby Shower Favor

If you read the yesterday's post you will know what I am talking about. If not, ketchup!! Man I crack myself up sometimes! (this usually means I should have been in bed long ago.)

I tried to respect my friend's wishes about her anti-shower but I mean c'mon........who doesn't like an excuse to make favors?? and since I now feel compelled to add shrinky dinks into my projects when I can, I thought about making some charms. And what can you add charms to?? How about sour cream containers??

If you have never made them, sour cream containers are very easy to make. Okie has a great video tutorial you can watch on this link.  Mine were a little on the small side since I don't have a lot of paper that is boy themed so I was trying to get 6 out of a sheets of 12x12 paper. If my friend had been cooperative and was having a girl we would have been all set (as I have a gamillion sheets of baby girl appropriate paper), but noooooooo.... there is just no accounting for some people.

Where's the project?? Oh you probably want to see it don't you??


The crafty details: 

I chose three designs in New Arrival to use: the onesie, the rattle, and the feet. Pre-shrunk they were cut at 3 inches. The feet required some overlapping and welding to get them to be in the same cut, but it worked out well in the end. I drew them first with my cricut markers, cut using max pressure, blade depth 6 and multi-cut twice, and then colored them in with my watercolor pencils. Then it was into the toaster over for shrinking, and I added two jump rings to each so that they could be attached by brad to the containers. The shrinky dink material was NOT my friend on this particular occasion but I made it work eventually!

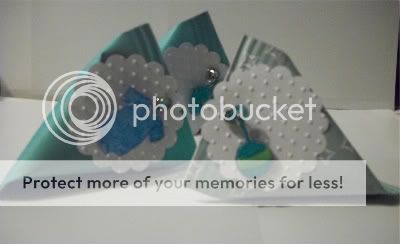
I cut a scalloped circle from Mini Monograms (I would so be lost without that scalloped circle! worth buying the entire cartridge for!!) at 2 inches and ran it through my Cuttlebug with the Swiss Dots folder. I assembled my containers, adding some M&Ms, then used my Big Bite to punch a hole in the container, added the tag with the shrinky dink and fastened with the jewel brad and they were all done!

These really are a sweet treat that is as simple or as complicated as you want to make your tag, and they were a bit hit at our girls night dinner. Up tomorrow is that baby themed container I teased you about yesterday.

Saturday, November 13, 2010

Princess Party Week Begins!!

Well in case you couldn't tell from the blog name, birthday parties are one of my favorite things to do! And I have finally gotten together all the pics from my daughter's last party, so that I can share them with you. I initially tried to put everything into one blog post, but when it began to resemble an epic I decided to break it up a little bit, so I hope you can join me for Princess Week here on my blog!

This year's theme was Princess Tiana, she has been talking about it since the Princess and the Frog came out, so I have had a while to plan and scout out my options. Unfortunately, Provo-Craft has not yet come out with a new Princess cartridge (SIGH), so  we had to be a little creative. They do however have a frog prince on Once Upon A Princess so that is where we started.

Starting with the invitations...

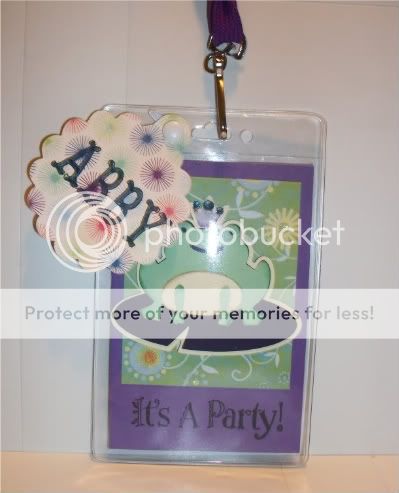
I had the bright idea to place the invitation on a lanyard, sort of like a backstage pass. I had planned on making the lanyards but then I remembered ebay!! I was able to get 24 of them (with the plastic sleeve) for less than a dollar a piece and, more importantly,  in Princess Tiana purple.


The crafty details:

Using the lanyards meant that the invites are actually rather small, I think they ended up being maybe 3 and 1/4 inches by 4 inches. The printed paper is from a DCWV Pocket Full of Posies stack and the stamp is a Studio G. I did not have enough of the printed paper to do all 16 invites in the same color so half were blue and half were green.
 
The frog prince is cut at 1.85 inches and as you can see from the close up I inked the top layers of every dang little frog which was a huge pain in the hiny!! But I have to admit, it really made a difference in how nice it looked. I used heat set gems on the crown, and the frog is pop-dotted on the front of the invite. The inside had a pic of Princess Tiana and all the important party details. Attendees were told "princess attire is suggested but not required".

Instead of putting them in envelopes, I made tags for them using the scalloped circle from Mini Monograms, the charm circle from George and Basic Shapes, and the font from Storybook. Welded together, they were about 3 inches high, and I attached them with a brad.

How did I get the names on? At the time I used a gel pen with a rubber grip, but this would be another spot where Cri-Kuts would come in handy. In my gypsy file, the first layer of the design held the names sized to fit within the tag, while the second layer was the tag shape. Using the pen, I drew the names on the paper first, and returned to the design without unloading the mat. Then I selected the second layer, switched out the pen for the blade housing, changed the pressure, and cut the tags out with the blade. The last step was to color them all in with a marker. I liked it better than trying to roll up the lanyard to fit in an envelope.

These invites were daughter-approved and they were a HUGE hit with the girls. I heard about them constantly from parents the weeks in between the invite and the party. The best part - some of them even wore them to the party so I know they weren't thrown out!

Stay tuned tomorrow for any princess's best friend - accessories!