Showing posts with label The BugBytes. Show all posts

Tuesday, January 17, 2012

Valentine Ribbon Plate

Happy New Year to my poor neglected followers! I haven't forgotten you, I am just entering my busiest time of the year, and I am meeting my obligation for The BugBytes today, and I wanted you to know that I am still alive but that I will definitely be hit and miss for the next few months.

I actually had another project done and photographed and because I am nuts decided that it was the wrong time of year for that particular project and to make this instead - so I will be sharing the other project next month or the month after. I have had ribbon plates on the brain since my friend Dayna posted this one a few months ago, and was lucky enough to pick up some small ones at Hobby Lobby on my last trip.And after the ease with which this project came together,  I can definitely see some more in my future!


The details: 
The image is from LoveStruck 2010 and is cut at 3.75 inches out of red vinyl. I will admit I had to cut it a few times before I got a clean cut, but it had been a while since I had replaced my blade. In fact, the longest part of the whole process was attempting to cut the image twice before biting the bullet and getting a new blade out (this is about where the mumbling and grumbling started too but that's another story). A new blade was just what I needed, and then it was actually very easy to weed the image, place painter's tape over it and transfer it to the plate. 

I thought the American Crafts XOXO ribbon I had on hand was a nice fit with the image, and I used about a 42 inch length of ribbon, which went all the way around the plate and gave me plenty left to hang the plate. I tied a knot in the back and then a bow at the top which I did not photograph for fear you would all laugh at my sad bow skills. 

This really was a simple and easy project - in fact  - I am sure this blog post has taken longer than the project did! If I am not a frequent poster over the next few months, I haven't forgotten you - just that pesky life getting in the way - I will be back!


Pin It

Tuesday, December 20, 2011

Another Snow Globe Ornament


Hello everyone! It's time for my monthly post on The BugBytes and I am going to share with you another snowglobe ornament, like the one I made for the blog hop, but this one is a little more grown up. I also took a few more pictures so hopefully it is clearer how it all comes together!

 The details: 
So this is a very similar process to my previous post, I begin with a two piece ornament from Micheals and a  3.05 circle cut out of a recycled cartridge clamshell. Then I placed my scene on the acetate with black and white vinyl. The Santa (1 inch), trees (1.80 inch) and the church (1 inch) are from the Christmas solutions cartridge. I cut each image twice (once regular and once flipped) so that it looks the same from both sides. So this is what it looks like before I assemble it.


I filled the two halves with snowflake glitter and then I get ready to place the acetate inside. In this picture you can see there is an inner lip where the circle will fit (ignore badly manicured finger):


The circle fits in perfectly cut at that size and then I have one half of my ornament complete. 


And then I carefully slide the other side of the ornament in and add a ribbon to the top to keep it together. I didn't think it was necessary to add glue until I came home and saw what my two year old had done to it when my husband was "watching" her *SIGH* all that wasted glitter.


Apologies for the bad picture, but I think Yukon Jack is peeking out there to say hi! I hope these instructions help in understanding the process a little better and I really hope there are some of these left on clearance by the time I get to Michael's again!

Friday, December 9, 2011

Holiday Blog Hop & Snow Globe Ornaments

Hello all! Today is the Holiday Blog Hop for the BugBytes Design Team. This is your last stop on the hop and you should have arrived here from Melissa's blog, and when you are done, make sure to go back to Pam at TheBugBytes so that you can add your holiday project to the linky! If you are joining this party already in progress you can also start the hop with Pam's blog!

Apologies to my regular followers for being a bad blog mommy lately and neglecting my blog, I have projects done just no time to write the posts! And more apologies to the hoppers because I really love this project but it totally does not meet the requirements of having red or green or silver or blue. So what my migraine medicine is telling me is that I should go with my inner lawbreaker and say since there is purple in this project and red + blue = purple then this project qualifies. Yeah - let's go with that!!


The details: 

This is a snowglobe ornament that I picked up at Michael's  - they come in two pieces and allow you to place something in the middle. I decided that they were dying to be made into snowglobes and I have had this idea for a long time - so glad it actually worked out! This is also another one of my "recycling" projects because I used my cartridge clamshells as the center of the ornament! (I have a few clamshell pieces....or perhaps a alot). My original photos are taken on my daughter's purple Christmas tree so I thought I would take some without the distracting background so the directions would be clearer.

 I cut a 3.05 inch circle out of the clamshell using my Gypsy - and yes it has to be that size - 3 inches is too small and 3.10 is too big and then placed a 2 inch snowman from Winter Frolic cut in vinyl with some of the layers on one side of the plastic circle. I flipped the image and all the layers and placed the other snowman on the other side of the plastic circle, layering it as exactly as I could over the first snowman. I stamped two different snowman faces using my Peachy Keen Stamps and Stazon ink and colored in the nose with an orange sharpie. I felt like he needed some bling and I especially appreciated I could use two different kinds - one for each side! Who wants buttons when you can have MS mini bling??

I added some Martha Stewart snowflake glitter to one half of the ornament, placed the circle over it, added glitter to the other half and sandwiched them all together. I did add some glue to the inside rim but I am not sure a) that it was necessary or b) that it really worked. Since this was going in my daughter's room I mixed some glow in the dark glitter with the snowflake glitter too, but you can only see it when the lights are out. Oh well - it was still fun!

This project just reinforced my love of vinyl + acetate - they are a match made in crafting heaven! My only regret is I only bought two of these ornaments which means a trip to Micheals is now a necessity and I don't know when I will have the time! I will strive to post my other snowglobe ornament next week.

Make sure you go back to Pam at TheBugBytes and particpate in the linky party! And in case you need it, here is the full blog hop list:

  1. Pam 
  2. Jeannie  
  3. Jen 
  4. Carole
  5. Lisa Brooks 
  6. Audrey  
  7. Mila
  8. Sheila aka sassylady 
  9. Elizabeth 
  10. Kelly Millet 
  11. Dayna Sabrina 
  12. Lori   
  13. Denine Vajja
  14. Melissa 
  15. Allison - you are here! :)    


I hope you found lots of inspiration and have a wonderful holiday season! Happy crafting!


Tuesday, October 25, 2011

Blog Hop Winner

And the winner of the twine bundle according to Random.org is.....

and that means the winner is.....


Congratulations Carole! Email me your info so I can get your twine out!!

Saturday, October 22, 2011

Halloween Hop! Popcorn and a Sweet - No Tricks Just Treats!

Hello and welcome to this stop on The BugBytes Design Team blog hop!If you are on the hop you should have arrived here from Kymberlee's blog. If you are just starting here you are going to want go back to The BugBytes to start at the beginning. My wonderful fellow designers who are taking part of this Halloween/Fall Hop and Linky Party are:
Allison - YOU ARE HERE!


 I am sure I am going to wake up Saturday morning and be mortified that I posted this among all the other fabulous work the designers have done, but I am going to anyway! So that being said, let me introduce you to my friends....Frank, Jack, and their Mummy!! Oh I love Halloween puns!

The details: 

These are actually popcorn treats for the "specials" teachers at my daughter's school. I have other things in mind for her regular teacher and the aides but I thought it would be nice for her to give a treat to the people who teach art, music, gym, and library. This is also a project that grew as I started to work on it, otherwise known as "why can't I ever just leave it alone?""

I started off with a 10 by 7 1/2 inch piece of paper. I scored it at 3 inches and 7 1/4 inches. 

I used Scotch brand double sided tape on two sides. (Hint: do not have regular tape on table next to double sided tape or lots of tape will be wasted. Why you ask?? no reason.)

I decided to use a single serve bag - good for a quick treat at school. 

I laid the bag down before folding the pocket together  - kind of necessary to ensure you have enough room for it. 

Then I slide the bag down so I can crimp the end. Then I add another piece of tape in the open end and crimp that side as well. Which leads me to....

one complete popcorn packet! But he was looking lonely (and a little plain) so I decided he needed something else - a mini me! (oh and stickles because you can always use sparkle)

Besides who doesn't like a candy bar to go along with your popcorn??  To make the candy bar wrapper I followed the same steps but with a 7 1/2 by 6 piece paper - scored at 2 and 4.5 inches. I also made a second pumpkin version with a different style face. 


Here are Frankenstein and  Frank Jr.  

And let's not forget Mummy and the little mama. 

The mummy took a little more time and care - I cut a bunch of long one-inch strips and inked the edges. Then I placed them randomly on top of the finished packet but hanging over the sides  - here's a picture: 

Then I trimmed the extra off the side with scissors. I had to put a little bit more adhesive to keep the edges of some of the strips down but it wasn't too bad. 

For all the faces I used the Pumpkin Carvings cartridge, which I just love so much. The only one that needed serious tweaking was the Frankenstein - his face is all cut at one size but his hair is cut much larger so it fit the width of the packet. I am perfectly happy to share the gypsy file for all three faces with anyone who wants it. Even though that means I will have to plug it in and update it - I am willing to make the sacrifice! I love the way these came out and I can't wait to wrap them up in bag with some Halloween twine! 

And speaking of twine, I am going to give a set of Trendy Twine away! I will give away 6 of their gorgeous colors all spooled on my thread bobbin system (which you can see here) and all you have to do is leave a comment on this post by Monday October 24th and I will select a winner! Make sure you leave me a way to contact you. 

I hope these inspire you to make some of your own Halloween treats - almost as much as I hope I don't die from embarrassment when I compare these to all the other work you will see on our hop today! Your next stop is Kelly's blog and then at the end make sure you go back to The BugBytes to join the linky party. Have fun and Happy Halloween!


Tuesday, October 18, 2011

Jungle Cruisin'


It is my day on The Bug Bytes today, and I am sharing another Disney layout. Of all my Disney layouts that I have worked on lately this one is my favorite and so I am so happy to let you all see it! One of my conundrums is how to balance my layouts with the pictures and "story" - and I think I got a nice balance here.


The details: 

The background paper is from DCWV Safari Kids and the photo mats and tabs are Recollections. For the "folders" I used the recipe cards on From My Kitchen and I don't really have specific sizes - I just unlocked the width and height  on my Gypsy and adjusted each one according to my photo sizes. I know you can't really see from the pictures but I used the CM paper distress tool to distress the edges of each and then inked the edges lightly. matted each picture with photo corners and cardstock.


For the title I used the Zoo Day font, which is one of my favorites, and I cut it at 1.30 using Green Core'dinations cardstock which I sanded a bit. The shadow is in kraft paper and I for the life of my don't know why the shadow layer didn't come out exactly perfect - I thought I was using the same size - but I was at the point where I was ready to just go with it and move on. Again hard to see but the title is pop dotted to make it stand out. 

Now that I am done with this post I realize the pictures are not really doing this layout justice so you will have to take my word for it  - much better in person. I am really looking forward to our hop this weekend - can't wait to see what the team has in store - so I will see  you then!

Tuesday, September 20, 2011

Birthday Clutch


Hello everyone! It is my day here at The Bug Bytes with apologies for the late post. I spent the night in the ER with my little one, but now that she is alright I am determined to get this post done before I crash. I created this quick paper clutch in less than 15 minutes as an alternative container to wrapping for a little girl's birthday present.

The details: 

This was super easy and quick! Using the purse feature on Forever Young, I selected the "posh" purse and hid contours so that the word didn't cut out on the front. I sized it rather large at 7.30 on the 12 by 24 mat using the Designer Handmade 12x24 paper stack by K and Company. I made it this size because I needed to fit a lip gloss compact and some nail polishes in there. I scored the lines using the pre-cut scores marks and assembled using Terrifically Tacky Tape (ATG does not cut it on keeping the purses together). Then I simply punched a hole in the front and added a few flowers (Recollections and Prima) and a large jeweled brad (Oriental Trading Company). I was done in no time at all - which was good because the party was starting in 20 minutes! If I had to make this again (and I have already had a request from my daughter for one) I would probably add some velcro circles for closure and perhaps a ribbon handle. And now I am off to bed!

Tuesday, July 19, 2011

Summer Fun Goody Bags!

Hi everyone! I am thrilled to be here at The BugBytes, and I decided to bring  you what else? Some goody bags that I created for my daughter's kindergarten class. The last two years I have been fortunate enough to find enough good deals on books that I could provide every child in her class with 5 books to take home for the summer, and these are what I designed to house them! (Can you tell I really really believe in summer reading?) And of course I threw in some other summer fun goodies like bubbles and mini paint kits and various other goodies.

This post must come with a disclaimer - do as I say not as I do! Why you ask? Because while cutting sandpaper is a good idea in theory - in actuality it is not only a PITA, it killed my first machine. She never quite recovered and no amount of resets could save her. *bowing head for moment of silence*


The details:
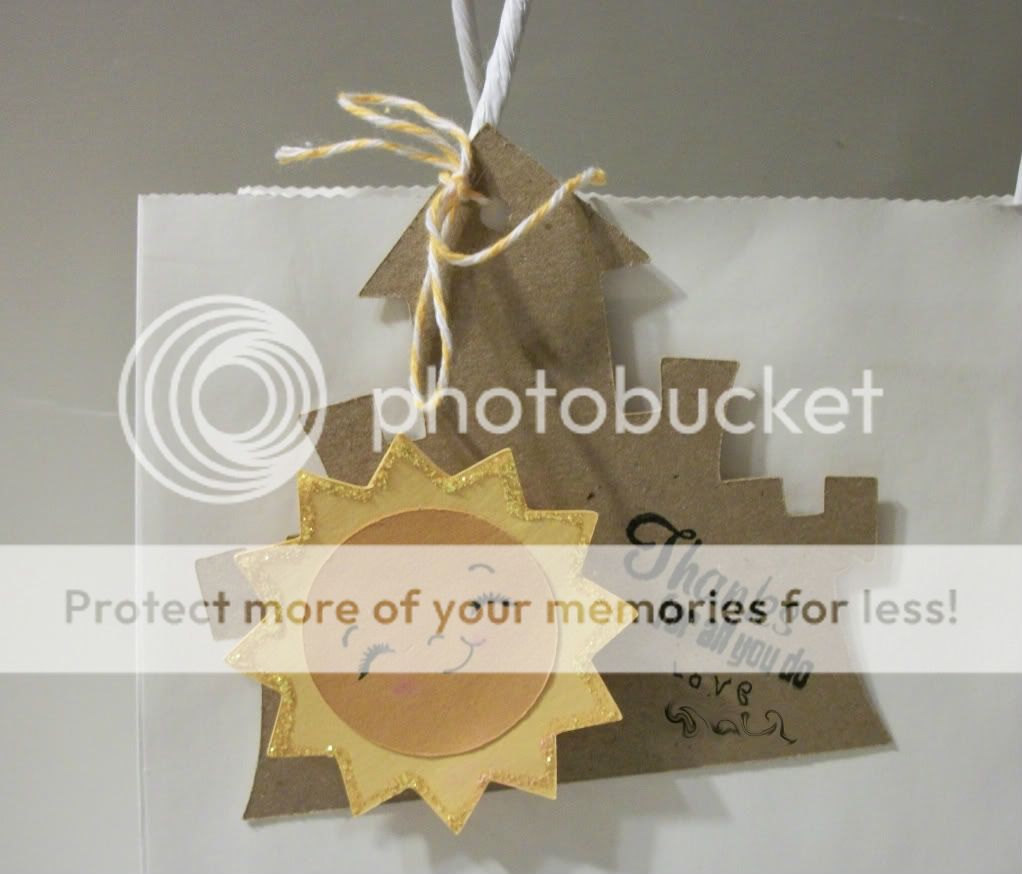
Now that I have given you the official disclaimer, you should know the sand castle is cut at 4 inches from Create a Critter, with the top layer being sandpaper (really people - steal it out of the kids sandbox and xyron it) and the bottom being craft paper. The whole thing is on an action wobble - because that made the packaging fun!

 
The wobble in action!
The sun is also from Create a Critter cut at 2.50 inches, except I replaced the top layer with a 1.5 inch circle from George and a Peachy Keen Stamp. I chalked the cheeks of the sun and also used stickles around the the outside layer for the sparkly effect. I finished the bags off with some MS word art printed on clear labels and adhered to the bag.

The best part is that I loved these bags so much I made coordinating tags to go with the teacher goody bags - which contained a class picture candle and a mini spa kit full of items to help the relaz and rejuvanate!
In the case of the tags, I only used the bottom layer of the sand castle cut on kraft paper (I was tired of fighting with sandpaper - remember -good for distressing, bad for machine) and I put the sun on an action wobble - because I really do love those things. They provide me with so much joy and entertainment! I finished the tags with a Fiskars stamp and had my daughter sign them and attached with some baker's twine. Easy and adorable! That's all for me this month at The BugBytes - see you in August!

Friday, March 18, 2011

TheBugBytes!

I am over the moon to announce that Pam aka TheBugBytes actually asked me to design for her blog! Isn't that just insane? Maybe okie smacked her a little too hard one day and she didn't know what she was doing....so until she comes to her senses I am going to run with it!

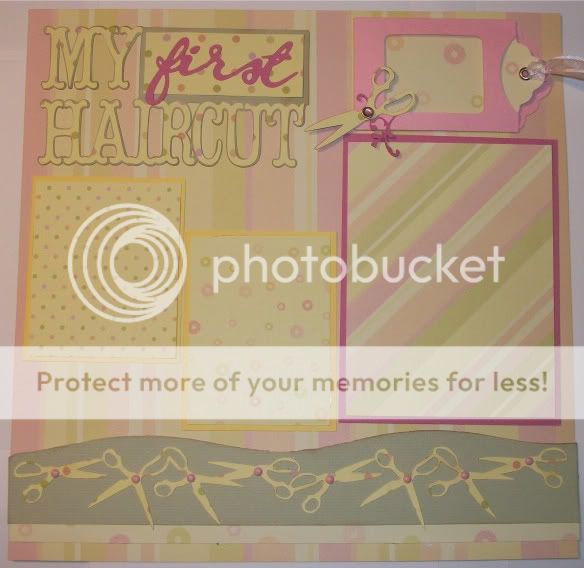
Today is my first day at TheBugBytes and I have posted this layout that I designed for baby's first haircut!


I hope you will stop by and check out the details! I am also sharing the gypsy file for anyone who wants to email me.