
This year's theme was Princess Tiana, she has been talking about it since the Princess and the Frog came out, so I have had a while to plan and scout out my options. Unfortunately, Provo-Craft has not yet come out with a new Princess cartridge (SIGH), so we had to be a little creative. They do however have a frog prince on Once Upon A Princess so that is where we started.
Starting with the invitations...
I had the bright idea to place the invitation on a lanyard, sort of like a backstage pass. I had planned on making the lanyards but then I remembered ebay!! I was able to get 24 of them (with the plastic sleeve) for less than a dollar a piece and, more importantly, in Princess Tiana purple.


The crafty details:
Using the lanyards meant that the invites are actually rather small, I think they ended up being maybe 3 and 1/4 inches by 4 inches. The printed paper is from a DCWV Pocket Full of Posies stack and the stamp is a Studio G. I did not have enough of the printed paper to do all 16 invites in the same color so half were blue and half were green.


The frog prince is cut at 1.85 inches and as you can see from the close up I inked the top layers of every dang little frog which was a huge pain in the hiny!! But I have to admit, it really made a difference in how nice it looked. I used heat set gems on the crown, and the frog is pop-dotted on the front of the invite. The inside had a pic of Princess Tiana and all the important party details. Attendees were told "princess attire is suggested but not required".
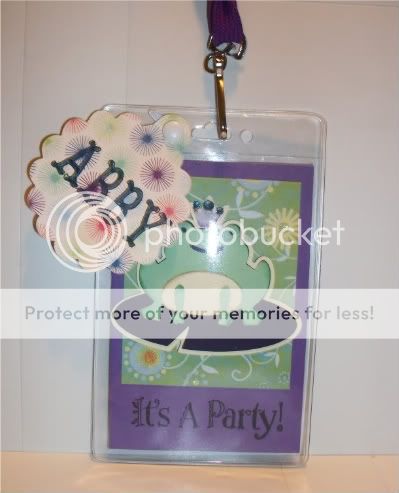
Instead of putting them in envelopes, I made tags for them using the scalloped circle from Mini Monograms, the charm circle from George and Basic Shapes, and the font from Storybook. Welded together, they were about 3 inches high, and I attached them with a brad.
How did I get the names on? At the time I used a gel pen with a rubber grip, but this would be another spot where Cri-Kuts would come in handy. In my gypsy file, the first layer of the design held the names sized to fit within the tag, while the second layer was the tag shape. Using the pen, I drew the names on the paper first, and returned to the design without unloading the mat. Then I selected the second layer, switched out the pen for the blade housing, changed the pressure, and cut the tags out with the blade. The last step was to color them all in with a marker. I liked it better than trying to roll up the lanyard to fit in an envelope.
These invites were daughter-approved and they were a HUGE hit with the girls. I heard about them constantly from parents the weeks in between the invite and the party. The best part - some of them even wore them to the party so I know they weren't thrown out!
Stay tuned tomorrow for any princess's best friend - accessories!
Love these! Invitation necklaces - so clever with those lanyards!
ReplyDeleteCan't wait for 'accessories' tomorrow!!
These are very cool! I love this idea!
ReplyDelete