Sunday, March 27, 2011

A quick project so you know I am still alive

I haven't forgotten my blog and I haven't even been neglecting my craft room, I just have been too lazy to write up some blog posts. This is a quick project that my daughter and I created last week for a school project. She was assigned the role of snake in the school's word parade so after vetoing my idea of a butt rattle this is what we came up with!

The details:
The visor was just a plain white craft foam visor that I stamped with Versamark ink and heat embossed. The stamp is an animal print one that I picked up on clearance but it worked for looking scaly. The jury is out as to what kind of chemicals I released when heat embossing foam - but hey it worked! We added some large googly eyes and a paper tongue.


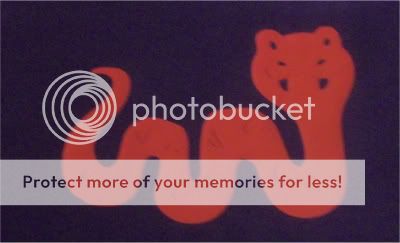
The t-shirt has a snake from Paper Doll Dress Up and is cut at 5 inches Real Dial Size. We used Heat Transfer Vinyl, and I didn't take a picture of the back but we did the "rear view" of the snake on the back of the t-shirt (thanks to the hide contour feature). The colors of both the t-shirt and vinyl were not my decision, and I did have help with the ironing as well.

Overall she was very pleased with the outcome (even if she wasn't so thrilled to be a snake in the first place) she had a great time running around and hissing like a snake - the bonus was getting to scare grandma! 
I shall, as always, endeavor to be more on top of things and get posting!

Friday, March 18, 2011

TheBugBytes!

I am over the moon to announce that Pam aka TheBugBytes actually asked me to design for her blog! Isn't that just insane? Maybe okie smacked her a little too hard one day and she didn't know what she was doing....so until she comes to her senses I am going to run with it!

Today is my first day at TheBugBytes and I have posted this layout that I designed for baby's first haircut!


I hope you will stop by and check out the details! I am also sharing the gypsy file for anyone who wants to email me.

Wednesday, March 16, 2011

Happy St. Patrick's Day!

I have to admit - it's one of my favorite holidays! I think I will probably sneak downstairs for more soda bread before I even finish this post! This project is completely inspired and scraplifted from Jana Eubank at the Cricut Circle blog - I was all in a tizzy because I was stumped as to what to do for St. Patty day goodies for my daughter's class. She posted these gable boxes along with some Rolos and she became my crafty hero! As an added bonus these are also my entry for the circle weekly blog challenge.

Front of box:
Back of box:


The details:

These boxes are cut at 3.5 inches and hold about 9 rolos  - they probably could hold more but I don't like to sugar 5 year olds up too much  on a school day so I held back a little. The "Luck" image was also cut at 3.5 inches and for the back I resized another one of the blank layers to fit in the pre-designed marks on the box. I heat embossed the gold image on the back with a Studio G stamp.  The box base and back are Recollections cardstock but the front image layers are both cut out of DCWV adhesive backed paper.

Mmm that was good soda bread! Next up - Guinness! Happy St. Patrick's Day!

Friday, March 11, 2011

Cars Card and Pail Set

I know! Another card! I am on a card streak for some reason, but I hope to be back to crafts soon - and then dare I say it - layouts??

This particular card was born out of a thread on the Cricut Circle message board - Myamagoo asked if you could use your Cricut Markers with copics or watercolors so I decided to experiment! As an added bonus, I had already put together this basket for a little boy recovering from surgery so it ended up being a multi-tasking project!

Front of card:

Inside of card:

The details:

This is not a traditional size card - I actually don't remember the dimensions  - is long and skinny an official card size??  - but I wasn't too concerned since I wasn't mailing it. Lightining McQueen was drawn with the Cricut Markers at 3 inches. Then I colored him in using my Martha Stewart watercolor marker set. I used the blending pen when I was done but if I got it on the Cricut marker line it did bleed a little bit. I was pretty happy with the result. Then I added a sentiment stamp and cut with a paper trimmer in a rectangle around him. I added a layer of scrap paper from DCWV Nana's Kids Stack and added some Oriental Trading Company brads to the corners. You can't see in the pic but the brads have wheel like swirlies on them - I know  - here I go again with the real official craft talk.

Mater was drawn with the markers at 3 inches and colored in with Martha Stewart watercolor pencils. I used a Prismacolor blending pencil over the top after but I have to say I was less happy with the result - of both the pencils and the blending.  I didn't really think ahead and plan a shadow layer cut so I did have to hand cut around him but it wasn't too much of a chore. Then I added a strip of the same paper to the inside (I had to - blame Joy at Obsessed With Scrapbooking - I think it is a card law) and pop-dotted Mater on the inside.

Since this began life as an experiment it was easy to put together - which is my favorite kind of card! I may have one more card for you - but we'll see what happens!

Tuesday, March 8, 2011

Nifty Thank Yous

Whilst I was neglecting my blog I did have a good reason, or at least a legitimate one. I was working on the high school musical and it just so happens that the Nifty Fifties cart fit the theme of the musical perfectly! That was a good enough excuse for me to be able to use it to create a series of thank you cards for the parents that helped out. I also did a little of craft multi-tasking and played with the new core'dinations paper I had just got in the mail (dang that enabling okie....but that's another story).


The crafty details:

The record and shoes are cut at 3.50 inches while the guitar is at 3.80 inches (on the gypsy). The card bases are all A2 size from a DCWV set, the black and blue papers are the core'dinations, while the other cardstock is DCWV. The sentiment is from the Fiskars So Much Thanks set.

Thanks for looking! More cards ahead!

Sunday, March 6, 2011

Liebster Blog Award

I won an award! Who expected that? not me! Caroline at Caroline's Craftography was so kind as to give me the Liebster Blog Award.
The Liebster Blog award is given to bring new blogs to light. It's a great way to share blogs that might not otherwise be seen or ones you want to share with others.

As a recipient of this award I must share and pay it forward by:

1. Creating a post where you blog about the Liebster award and reveal your 3-5 blog picks.
2. Let them know you chose them.
3. Copy and paste the blog award on your blog
4. Have faith that your followers will rally and show their crafty love back out to those you awarded.

I have to be honest, I feel a little bit about blog wards the way I do chain letters - don't send them to me because I will let them die BUT I really admire the work these people do and I want to share it with you. So, I have decided to past this award on to the following blogs that I really enjoy:

1. Heather at Houses Built of Cards. Heather is a daily blogger and her output of cards is amazing! And she does it all for a terrific cause!

2. Nadia at With Glittering Eyes - be forewarned - you are sure to get a complex looking at what Nadia creates - absolutely mind blowing!

3. Kymberlee at The Paper Midwife - Kymberlee is so multi-talented - not only does she papercraft but she can totally rock a CricutCake!

Please take a minute to visit these wonderful blogs and be inspired by them. I promise more posts are forthcoming - actually....more cards! gasp!