Sunday, November 21, 2010

Lollipop Flowers - How To

I love giving lollipop flowers as quick gifts - they are a nice treat and they look so pretty in a bouquet. Also a good use for paper that you like but not love. They do have a slight learning curve as you learn what works best for you  - but once you find what works best for you - so easy to crank a lot out.

First, you should know that this is a Kathy Orta idea, so therefore...
She also has a wonderful video on her blog, that you can see by clicking here. But if  you don't want to watch the video, or maybe can't right now (like you are at work, not that I EVER use the internet for personal use at work and I am sure you don't either), I have written out the instructions to make these flowers here with just pics.

The crafty details:

Each lollipop needs two flowers, and it works best if they are between 3.5 and 4 inches. I used Plantin Schoolbook for the flowers in these pictures, but you can definitely use George as well - in fact the last set I did I believe that is what I used - the only difference is the number of petals you get (4 and 6 with Plantin Schoolbook and 3 and 5 with George). 

You cut one petal off one of the flowers, and then overlap the two adjacent petals to close the space - basically altering it from 6 petals to 4. I use ATG tape to do this and haven't had any problem with them coming apart.

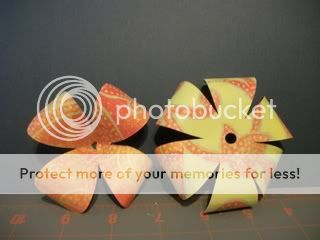
Next I use a pencil (or some such similar device) to curl the petals. Now it is time to heat up the hot glue gun! Potential burned fingers alert!!

You then gently work to slide the 4 petal layer onto the popsicle stick. Really it should be secure without adding glue to the lollipop base but you can if you so wish.  Then carefully (since I no longer have nerves left in my fingertips) apply a small amount of hot glue to the bottom of the first flower layer, and slide the bottom (6 petal) layer on the stick and slowly smush it (try not to get lost in the technical talk) into the first one. The smushing is necessary since the fit will not be as tight as the first layer but you really don't want to crease it to fit.


And that really is it! I am not going to sugar coat it - there is a slight learning curve - your first ones will not turn out as nice as your last - but I have found that the more you make, the easier it becomes. And I have found that to make them with George is a bit easier (less petals) than using Plantin Schoolbook, but that will also depend on how full you want to make them.

Before I forget - the plain clear wrapped lollipops - I found at the Dollar General  store, only a few dollars for a bag of 15 or so - not sure how they taste, but I love the way that they look and the colors they come in! I don't have to eat them so it doesn't really matter to me!

Well....what are you waiting for?? Get lollipop-ing!

Saturday, November 20, 2010

Quick and Easy Bouquet

Oh vinyl - how do I love thee? Let me count the ways!!

In all seriousness, if you have not tried vinyl yet - what are you waiting for??I absolutlely love working with this medium and today is a great example of that. I needed to put together a quick gift for my daughter to take to her friends at a play and I imediately thought of doing a lollipop bouqet! I had plenty of extra lollipop flowers leftover from Princess Party, so I concentrated on decorating the tin.

The crafty details:

I designed this cut in my gypsy, using the Hannah Montana and Printing Press carts. I used a 3.5 inch star from Hannah, and then put a smaller star inside it. Then I added the text from Printing Press and another teenier star. I grouped it all together and kiss cut it using my vinyl settings - 3 for blade depth, and medium for presure. I weeded the excess and then used painter's tape to transfer it to the tin.

All in all, it probably took me longer to design the Gypsy file than it did to actually cut the vinyl and put it on. If you haven't tried using vinyl in your crafting yet, get to it!!

Friday, November 19, 2010

A Royal Thank You

As we come to the end of Princess week, I have to round out the week with the thank you cards. It took me quite a while to decide on a design that I like for these cards, but once I did they were fairly easy to put together. I did three variations of the same design, because I tend to get bored mass producing the same thing, so I decided to play a little bit with the colors.


The crafty details:

The base of the card are the pre-made blank cards that I got on sale at ACMoore. I did not attach the layer to the front until after my daughter was done writing out the inside, in case there was a disaster - I didn't want to waste a completed card!

The top layer is glitter paper from Target, and I created a rectangle using George with the "thank you" cut out using Mickey Font, leaving enough room on the side for the ribbon I found the Princess Tiana ribbon in the craft section at Walmart, and ran it through my trusty Xyron to make sure it stuck. Then I added the bottom layer of plain colored cardstock, adding the center of the O and A, and adhered the whole thing to the front of the pre-made card. Really easy peasy once I was done obsessing over the design.

Why didn't I stick with the frog you might wonder?? I was tired of the dang thing!!! I need a serious break from that frog and its pain in the hiny teeny legs for a good long while.

I was hoping to show you some pics of the party location but unfortunately the camera I took them with is not cooperating. Hopefully I will at some point be able to get them posted. Thank you so much for joining me for Princess Week!

Thursday, November 18, 2010

Time for the Goody Bags!!

And finally the (what else?) goody bags!!

If you read my first ever blog post, you will know that I admit to going the teensiest, tiniest bit overboard when it comes to the goody bags. And these were filled with all sorts of wonderful things, thank in large part to my Cricut Circle Friends who came to the rescue when I needed more Crayola scrap packs because I could only find 12 in my area. (Some day I shall harness their power and we will take over the world! BWAHAHAHA)

 The crafty details:

These phrases are all from Once Upon A Princess and the bags were made using Heat Transfer Vinyl. Once again I get my vinyl from Nick at Craft Vinyl, and they are a plain vinyl base with the glitter top layer. The "angel" and "Queen 4A Day" phrase are cut at 3 inches, while the "Rock Star" is cut at 4. The bags are simply small canvas bags I was able to get six for a dollar at my dollar store.

If you have not tried heat transfer vinyl yet, what are you waiting for?? The process is very easy and super gratifying if you like instant results. These goody bags were filled with all sorts of treats for the crafty little girl and were a nice surprise for the girls at the end of a great party.

Winding princess week down, but thank you cards are up tomorrow!

Wednesday, November 17, 2010

Mini Purse Table Favors

What's a party without table favors??

I absolutely love the Forever Young cartridge and I thought this was just the excuse I needed to use it! These were to go at each seat at the table, and they were filled with lip glosses and mini glitter nail polishes.

The crafty details:

These are one of the plain purse options and are cut at 4 and 1/4 inches because with some tweaking on the Gypsy I could get two to a page.  The paper is from DCWV Summer Dreams two-sided stack, which I absoloutely love, and so I had a really hard time deciding which papers to use. I will say the papers with glitter were much harder to cut and did not stay together as well as the non-glittered paper. I punched a hole in the front and decorated with some Prima flowers I got on clearance long ago, and some jumbo gem brads for Oriental Trading Company. (Just an FYI, when OTC says Jumbo, they mean JUMBO). The best part was they were simple and easy to put together - I probably spent more time picking out the paper than assembling.

Once again, the girls eyeballed them for at least an hour before they dug in, first there was plenty of discussion about which purse they would be picking, and then when I gave the go ahead,  the comparing of lip gloss and nail polish. And in case you were wondering, they did get some dancing and coloring in too.

On the schedule for tomorrow?? The goody bags of course!

Tuesday, November 16, 2010

Princess Party Week - Centerpieces

Time for the centerpieces!

Now initially we were supposed to have the party in the movie theater and the adjoining cafe area, so I had planned for a bunch of small round tables. Due to scheduling conflicts, we ended staying in the theatre area but I still was able to use all my centerpieces.
  
The crafty details:

These are target dollar pails, and I went back to using my frog prince, cut at 2 1/2 inches for one side. Since I was using vinyl (and had learned from the invites) I used my Gypsy to make sure that the legs were cut of out his tummy, instead of having to layer additional tiny leg pieces. But again, I used the white vinyl and some Martha Stewart glitter to give him some extra sparkle. I also used my I-rock on the crown for additional bling. 

On the reverse side, the happy birthday phrase is from Create A Critter, and cut at 1.60 inches , the number 5 is from from Sweet treats cut at 2 1/2 inches. I also uses the font crown from Once Upon A Princess cut at .60 inches and just layered it on top of the 5 at an angle. Again, that crown needed a little glitter sparkle, but by this time I had gotten tired of using the I-rock, so only one gem as the dot for the "i".

Then I filled the pails with lollipop flowers made from George and Plantin schoolbook, the flowers are cut at 3.75 inches, and are a fabulous idea I got from Kathy Orta. The Tiana decorations were supposed to be hanging ones that I got for like 99 cents at Oriental Trading Company, and I cut little slits in them and put them on sticks instead of wondering if there would be a place to hang them. 

These were also a hit and actually survived about 2/3 of the party before the girls busted into them...oh the slaughter.....at least they did admire them before throwing away my pretty paper!!

Up tomorrow - party table favors!

Monday, November 15, 2010

Princess Party Week - Accessory Tubs

Did y'all know you can make glitter vinyl??

What is a princess party without Princess Gear?? Thanks to my love of ebay and ebay's close friend, Oriental Trading Company, I was able to invest in some princess accessories to set the tone for the party. After all, what little girl doesn't love to play dress up? I got crowns off of ebay  and necklaces, bracelets, and rings at OTC to set out for the girls to princess-ify themselves.  The ebay seller of the crowns was cheapbids4u and from the picture in the listing I really wasn't expecting too much, but they ended up being really high quality for the price  - sturdy and very sparkly!


The crafty details:

These are two dollar tubs from Target and the "Princess" is from Once Upon A Princess, and the "gear" uses the font on Nursery Rhymes.  I used some purple vinyl to cut the princess phrase at 2 inches, and the "gear" at one inch. I also added an inked circle of grungeboard with a Prima flower on it (so I can use that flower again!!)

How did I get the vinyl to get its bling on?? My trusty Xyron off course. I cut the layers in white vinyl and ran them through the Xyron. Now this process is not for the weak glitter-hearted, because when you peel it off both sides are sticky, so you kind of have to stick it to your finger, shake the glitter on, brush off the excess and apply quickly. The results are so cool though, it is totally worth it.

I set these on a table near the entrance to the movie theatre so the girls could accessorize as they came in, and it also ended up being a party hot spot, as they spent a good deal of the party running back and forth to get more bling!

Saturday, November 13, 2010

Princess Party Week Begins!!

Well in case you couldn't tell from the blog name, birthday parties are one of my favorite things to do! And I have finally gotten together all the pics from my daughter's last party, so that I can share them with you. I initially tried to put everything into one blog post, but when it began to resemble an epic I decided to break it up a little bit, so I hope you can join me for Princess Week here on my blog!

This year's theme was Princess Tiana, she has been talking about it since the Princess and the Frog came out, so I have had a while to plan and scout out my options. Unfortunately, Provo-Craft has not yet come out with a new Princess cartridge (SIGH), so  we had to be a little creative. They do however have a frog prince on Once Upon A Princess so that is where we started.

Starting with the invitations...

I had the bright idea to place the invitation on a lanyard, sort of like a backstage pass. I had planned on making the lanyards but then I remembered ebay!! I was able to get 24 of them (with the plastic sleeve) for less than a dollar a piece and, more importantly,  in Princess Tiana purple.


The crafty details:

Using the lanyards meant that the invites are actually rather small, I think they ended up being maybe 3 and 1/4 inches by 4 inches. The printed paper is from a DCWV Pocket Full of Posies stack and the stamp is a Studio G. I did not have enough of the printed paper to do all 16 invites in the same color so half were blue and half were green.
 
The frog prince is cut at 1.85 inches and as you can see from the close up I inked the top layers of every dang little frog which was a huge pain in the hiny!! But I have to admit, it really made a difference in how nice it looked. I used heat set gems on the crown, and the frog is pop-dotted on the front of the invite. The inside had a pic of Princess Tiana and all the important party details. Attendees were told "princess attire is suggested but not required".

Instead of putting them in envelopes, I made tags for them using the scalloped circle from Mini Monograms, the charm circle from George and Basic Shapes, and the font from Storybook. Welded together, they were about 3 inches high, and I attached them with a brad.

How did I get the names on? At the time I used a gel pen with a rubber grip, but this would be another spot where Cri-Kuts would come in handy. In my gypsy file, the first layer of the design held the names sized to fit within the tag, while the second layer was the tag shape. Using the pen, I drew the names on the paper first, and returned to the design without unloading the mat. Then I selected the second layer, switched out the pen for the blade housing, changed the pressure, and cut the tags out with the blade. The last step was to color them all in with a marker. I liked it better than trying to roll up the lanyard to fit in an envelope.

These invites were daughter-approved and they were a HUGE hit with the girls. I heard about them constantly from parents the weeks in between the invite and the party. The best part - some of them even wore them to the party so I know they weren't thrown out!

Stay tuned tomorrow for any princess's best friend - accessories!

Sunday, November 7, 2010

Oh Baby

baby baby oh yeah....sorry!! If I have to have that stuck in my head so do you! and since that needs-a-haircut moppet is currently the object of my daughter's affection, we have to listen to that a lot around here!But I digress...

I have been working on these two baby books for a while because I had the brilliant (read stupid) idea to make two 8x8 books for my colleagues who recently had babies; and of course the plan was they would be gifts before the baby was born...umm yeah...so now I will be satisfied if they make it to baby's first Christmas. I went to an all day crop, and got 14 pages done. Before that impresses you, it was really 7 pages done twice, as one is for a boy and one for a girl. Now I only have 4 pages in each left to do...I can see the light at the end of the overextended crafting tunnel!!

On to the pages already!!

The crafty details:

These first set are made using Create A Critter. The original plan was to label each page as "one month" or "two months" but I decided not to restrict them in that way. I might include some cut out tags for them to add to the pages as they wish. I am pretty sure the paper is DCWV Animal Stackers, but I got the larger paper in a repackaged set at Big Lots, but it coordinates with the DCWV photo mat set I got at CKC Buffalo. The monkeys and hippos are cut at 2 and 1/2 inches and the vine and grass are welded together using my Gypsy.
I added some inking to the grass to give it some texture, and it is hard to tell from the pic, but there is a little heat set gem in the flower on the hippo's hiny, as it were.

I used some green matte glitter paper for the first vine, but decided to faux stitch the second vine to mimic the paper, but I am not sure if I am pleased with the way it came out, since it seems to blend in so much.

What would a baby book be without some holiday pages? These Halloween pages are made with Mini Monsters for the phrase (cut at 3 and 1/2) and A Child's Year for the jack-o-lattern (cut at 2 1/2). The patterned paper is from the DCWV Midnight Spell Stack - I just love the colors of the plaid.

The cute monster brads are from the Eyelet Outlet, and I did a little bit of inking on the pumpkin and phrase but it is hard to tell from these pics.

I also did some quick Christmas pages using the paper from a Creative Memories kits that I had purchased. It was all I the Christmas paper I had with me, and I am pleased with the way they turned out.


The stocking is from Christmas Cheer, cut at 2 and 1/2 inches, and attached to the page with a jeweled brad from Oriental Trading.

These next pages have no Cricut, but I decided that I needed to use some of all that baby stuff I have collected to good use. The patterned paper in the first set is from K and Company, the titles and chipboard are from atd, and the ribbon slide is from Making Memories.

 
The chipboard says little piggy and the slide says messy.

In the next version, the paper is from DCWV Nursery Girl Stack.


In this one the ribbon slide says "oh baby".

And finally to round out my baby pages I did a simple birthday page for the first birthday photo.


The cut is from A Child's Year, cut kind of big - I think 4 and 1/2 inches. You can probably see it a little better in the second picture, I used my Cri-kuts gel pens to draw the image on the first layer in my Gypsy, and then used a shadow cut on the second layer to cut around it.  

Whew! I think the blog post took almost as long as the pages themselves!. I did save myself some time to do some pages for my daughter with Shall We Dance, but they are not quite finished yet.I feel much better knowing I only have 8 more pages until they are done  - what will take me the longest is deciding what they should be. Thanks for looking! I realize some of the photos are distorted, and I apologize - can't seem to get photobucket to cooperate.

Wednesday, November 3, 2010

Thank You (also known as a deviation from the plan)

So I sat down tonight to get a design worked out for thank you cards for the princess party extravaganza (future post alert) and I was thinking about markers today. Why? Because Enfys is having this terrific giveaway on her blog Going Buggy - a full set of Promarkers, which are high quality alcohol basedmarkers. Make sure you head on over there and enter; she also has great videos and tips.

With that out of the way, I was also thinking about Okie, since it was her blog that led me to Enfys, and how she makes me buy stuff I don't know I want until I read her blog (really... she makes me), and how she recently convinced me to buy the Cri-kuts gel pen and holder. Now, I am (or maybe was is a better choice of words) a Cricut marker girl. I love using those markers (again - future post alert) and when I wanted a thinner line? I did it the cheap way, also known as puttting a rubber grip on a  Hannah Montana mini gel pen taken from my daughter when she wasn't looking. BUT I just may be a Cri-kuts convert because I love, love, love the ease and convenience of using the Cri-kuts. I guess Okie does know what she is talking about (just don't tell her I said that).

Now before you think I just like to talk about other people's work, I promise I did actually make cards.
I bought the value pack of 25 cards at ACMoore when they were on sale, and I was really disappointed with the quality of the paper, however with some extra layers I am happy with the way they turned out.
Because the paper is so thin, I did add an extra layer of cardstock to the inside of the card.


The crafty details:

These cards are 4 1/2 by 5 1/2 inches and the mats are 4 by 5 inches.

I used my Gypsy and created the a file with two layers. On the top layer was my "thank you" which is cut at 1.20 inches (Real Dial Size) from Wild Card. On the second layer was this shadow cut from Storybook, cut at 2.60 inches.

I put the Cri-kuts holder and pen in the machine and adjusted the pressure to medium. Then I loaded the mat, pressed cut, and "cut" the phrase with the marker. When it was done I selected Return to Design (don't unload the mat!!), and replaced the marker holder with the blade housing. I re-adjusted the pressure to a higher setting, and selected the next layer with the shape cut on it. Then I pressed cut again, and it cut out the design around my drawn phrase.

Then I used a Martha Stewart gel pen to color in the phrase, and added some white chalk to the edges of the cut to soften the pink a little bit. I used my ribbon stash and put a piece across the center, and then placed the whole cut on top. Incidentally, I used my Xyron to adhere both the ribbon and the cut. It is an absolute must for ribbon!! (but I will try not to wax poetic about the Xyron right now - that's a whole other post)

I have to say I liked the design of this card so much - I made three more!! As an added bonus, all of the cardstock was from my scrap drawers.I just have to figure out if I am going to be able to part with these cards (maybe I will just thank myself).

 The other cards:


Thanks for looking! Now if anyone wants to come over and make those princess thank you cards for me - I'll be waiting!